Frequently Asked Questions
Find answers to common questions about Foreceipt
New to Foreceipt?
The fastest way to understand what the app can do is to watch the short
video below.
Recommended: Watch the App Introduction Video
2-minute video: Foreceipt mobile app key features overviewThis quick video walks you through all the core features of the Foreceipt mobile app in under 2 minutes and is the best place to start.
— Optional —
Looking for the Web Version?
If you're using Foreceipt on the web, you may also want to watch:
2-minute video: Foreceipt web app key features overviewThis video covers the main features available in the web version.
Recommended: Watch the Video Tutorial
2-minute video: How to scan and verify receipts in the Foreceipt mobile appThis video walks you through the entire process step by step and is the easiest way to learn.
— or —
Step-by-Step Guide
Follow the written steps below if you prefer reading or need a quick reference.
-
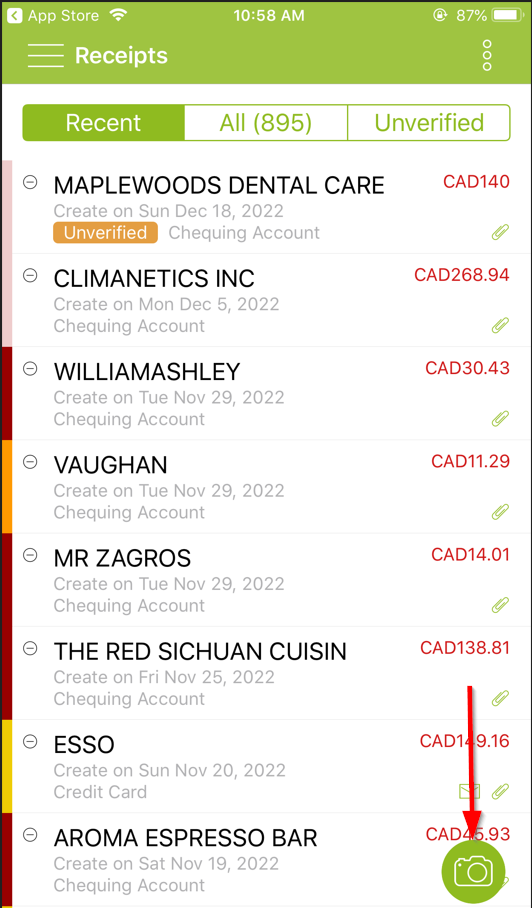
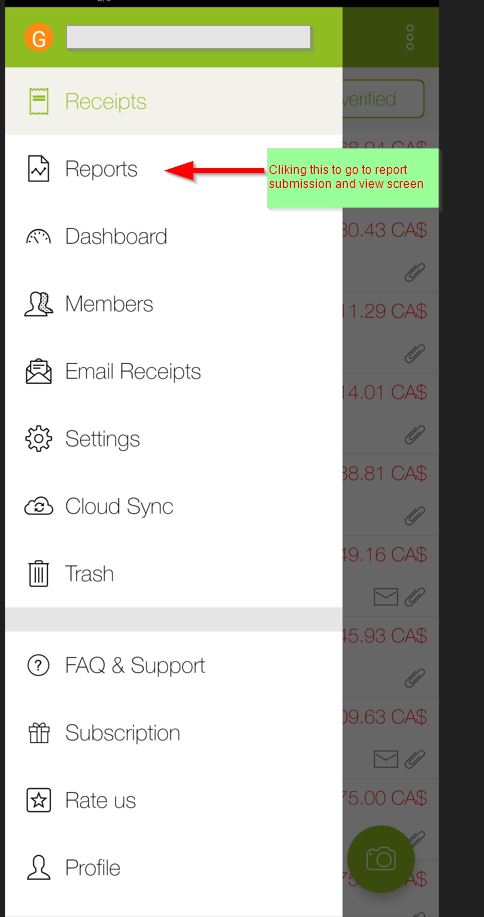
Open the Receipts Screen
-
Launch the Foreceipt mobile app. The Receipts screen appears by default. Tap the big "Scan" button at the bottom to initiate a new scan.
-
-
Capture the Receipt
-
Ensure you're in a well-lit area, center the receipt within the camera frame, and follow the on-screen guidance to get a clear capture.
-
-
Review the Scanned Receipt
-
Once scanned, the receipt will appear in the Recent list labeled as Unverified. Tap it to open the review/edit screen where AI-extracted details are displayed for your validation.
-
-
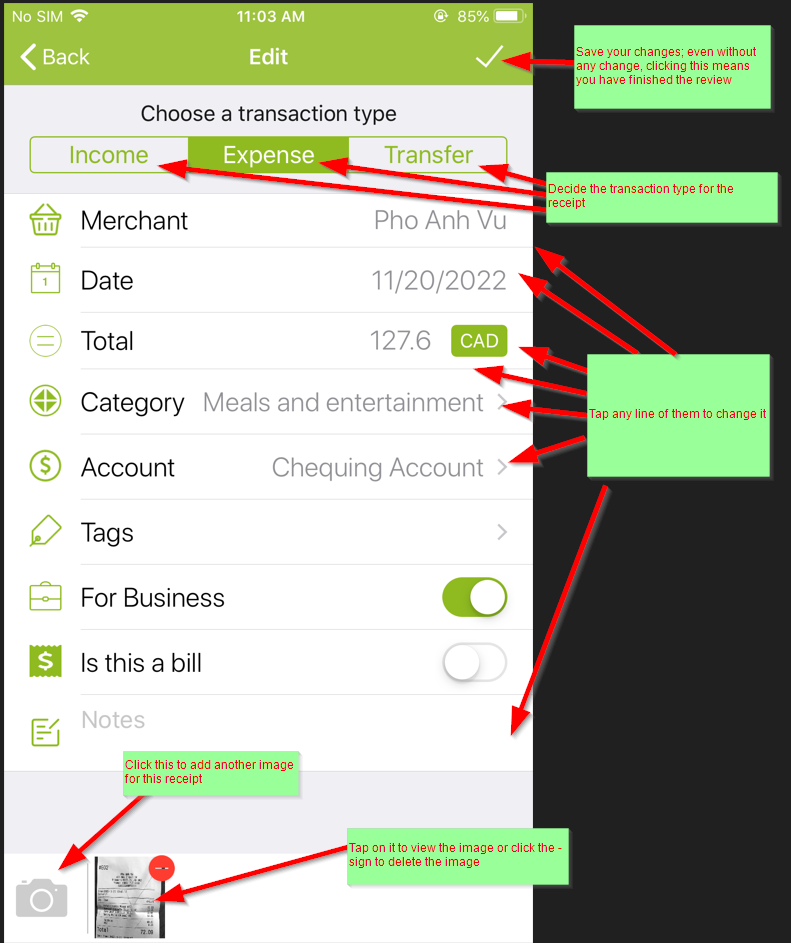
Verify and Adjust Details
-
Review the automatically parsed fields—such as date, merchant, and amount—and make any necessary edits. Once confirmed, simply save or confirm to complete.
-
Why It Matters
-
Accurate Records: Ensuring AI-extracted data is correct helps maintain precise expense tracking.
-
Efficient Workflow: The intuitive review screen streamlines error correction immediately after scanning.
-
Reliable Future Searches: Verified receipts become searchable and citable in reports later on.
Quick Reference Table
| Step | What to Do |
|---|---|
| Scan a receipt | Tap the Scan button on the Receipts screen |
| Capture clearly | Use good lighting and center the document |
| Find Unverified | The new scan appears as "Unverified" |
| Review and edit | Tap the entry, verify or adjust fields, then save |
Recommended: Watch the Video Tutorial
2-minute video: How to forward email receiptsThis video walks you through the entire process step by step and is the easiest way to learn.
— or —
Step-by-Step Guide
Follow the written steps below if you prefer reading or need a quick reference.
Quick Overview
-
Each user has a personal Foreceipt email address uniquely generated for submitting email receipts.
-
Forward your receipt to that email, and it instantly appears in your app under Recent → Unverified.
-
Review, edit if needed, and save to complete the process.
Step-by-Step Instructions
-
Access Your Unique Email Address
-
Open the Foreceipt mobile app.
-
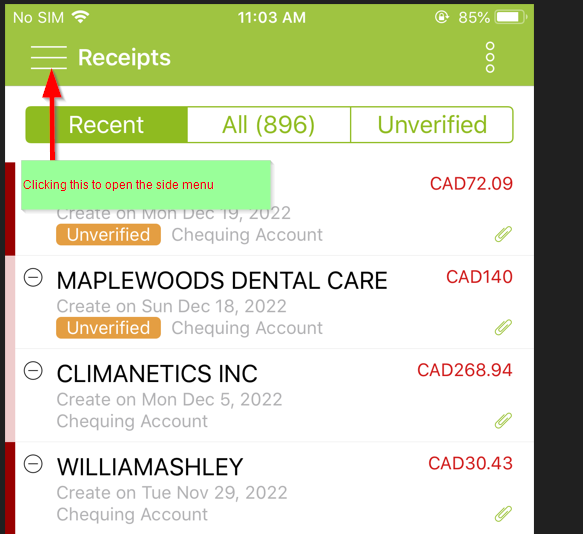
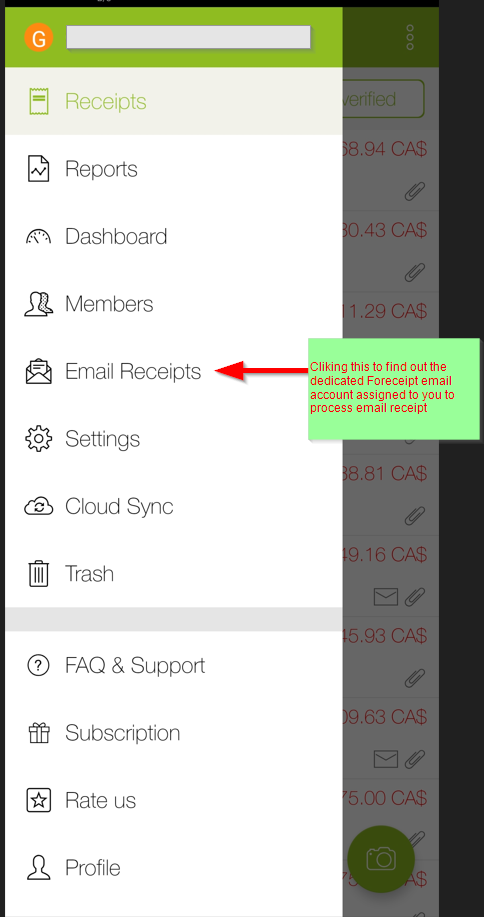
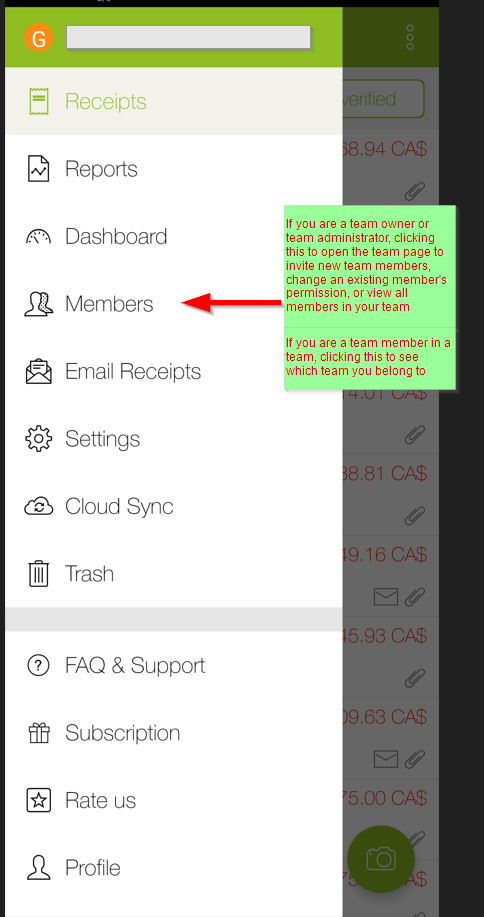
Tap the menu icon in the top-left corner to open the side menu.
-
Select "Email Receipts" to reveal your personal forwarding address.
-
-
Forward Your Receipt
Send the email containing your receipt—PDF or image—to that personal Foreceipt email address. -
Receipt Auto-Processing
Your receipt is automatically turned into a new entry that appears in Recent → Unverified within the app. The system extracts details like date, merchant, and amount. -
Review and Confirm
Tap the new receipt in the Unverified list to review and make edits if necessary. Finally, save to finalize it as a verified expense in your Foreceipt records.
Benefits at a Glance
| Feature | Why it Matters |
|---|---|
| Auto-parses receipts | Eliminates manual entry—fast and convenient |
| Visual review | Easily correct or confirm details before saving |
| Effortless email forwarding | Just forward—no need to upload or scan manually |
| Immediate access | Appears in-app as soon as it's processed |
Recommended: Watch the Video Tutorial
2-minute video: How to Generate Excel & PDF ReportsThis video walks you through the entire process step by step and is the easiest way to learn.
— or —
Step-by-Step Guide
Follow the written steps below if you prefer reading or need a quick reference.
Overview
You can generate Excel and PDF reports via both the mobile app and the web portal. While both methods work, the web version offers a more intuitive interface, especially when working on larger screens.
Using the Mobile App
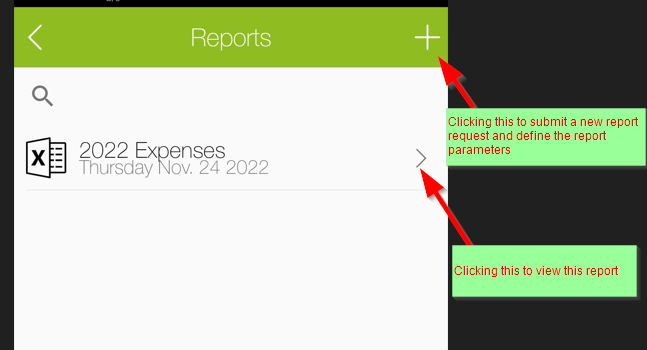
- Open the app and tap the menu icon in the top-left corner.
- Select "Reports" to access the reporting screen.
- Tap the "+" icon in the top-right to create a new report.
- Once processing is complete:
- You'll receive an email notification with a download link.
- You can also access the report from the Reports screen in-app.
- Feel free to forward the email to others as needed.
Using the Web Portal (Recommended)
Generating reports via the web portal offers a smoother, more spacious interaction, making it easier to configure and review your data.
Quick Comparison
| Feature | Mobile App | Web Portal (Recommended) |
|---|---|---|
| Screen & Ease of Use | Compact interface, ideal for quick access | Larger, more intuitive interface |
| Report Access | In-app "Reports" + email delivery | Web access with easier navigation |
| Sharing Reports | Forward email with link | Forward email with link |
Final Thoughts
- Use the mobile app for quick, on-the-go report requests.
- Use the web portal for a more user-friendly, efficient experience—especially when reviewing or creating multiple report types.
Recommended: Watch the Video Tutorial
2-minute video: How a Team Collaborates in ForeceiptThis video walks you through the entire process step by step and is the easiest way to learn.
— or —
Step-by-Step Guide
Follow the written steps below if you prefer reading or need a quick reference.
What Team Collaboration Enables
- Manage and track receipts collectively with team access.
- Set detailed permissions—Admins, Editors, or Viewers—to fit each role.
- Share, view, edit, and generate consolidated reports as a cohesive group.
Setup Guide — Step by Step
💡 Tip: While you can invite and manage team members from the mobile app, we recommend using the web portal. The larger screen and user-friendly interface make it easier to review team activity, manage permissions, and organize collaboration.
1. Create Your Team
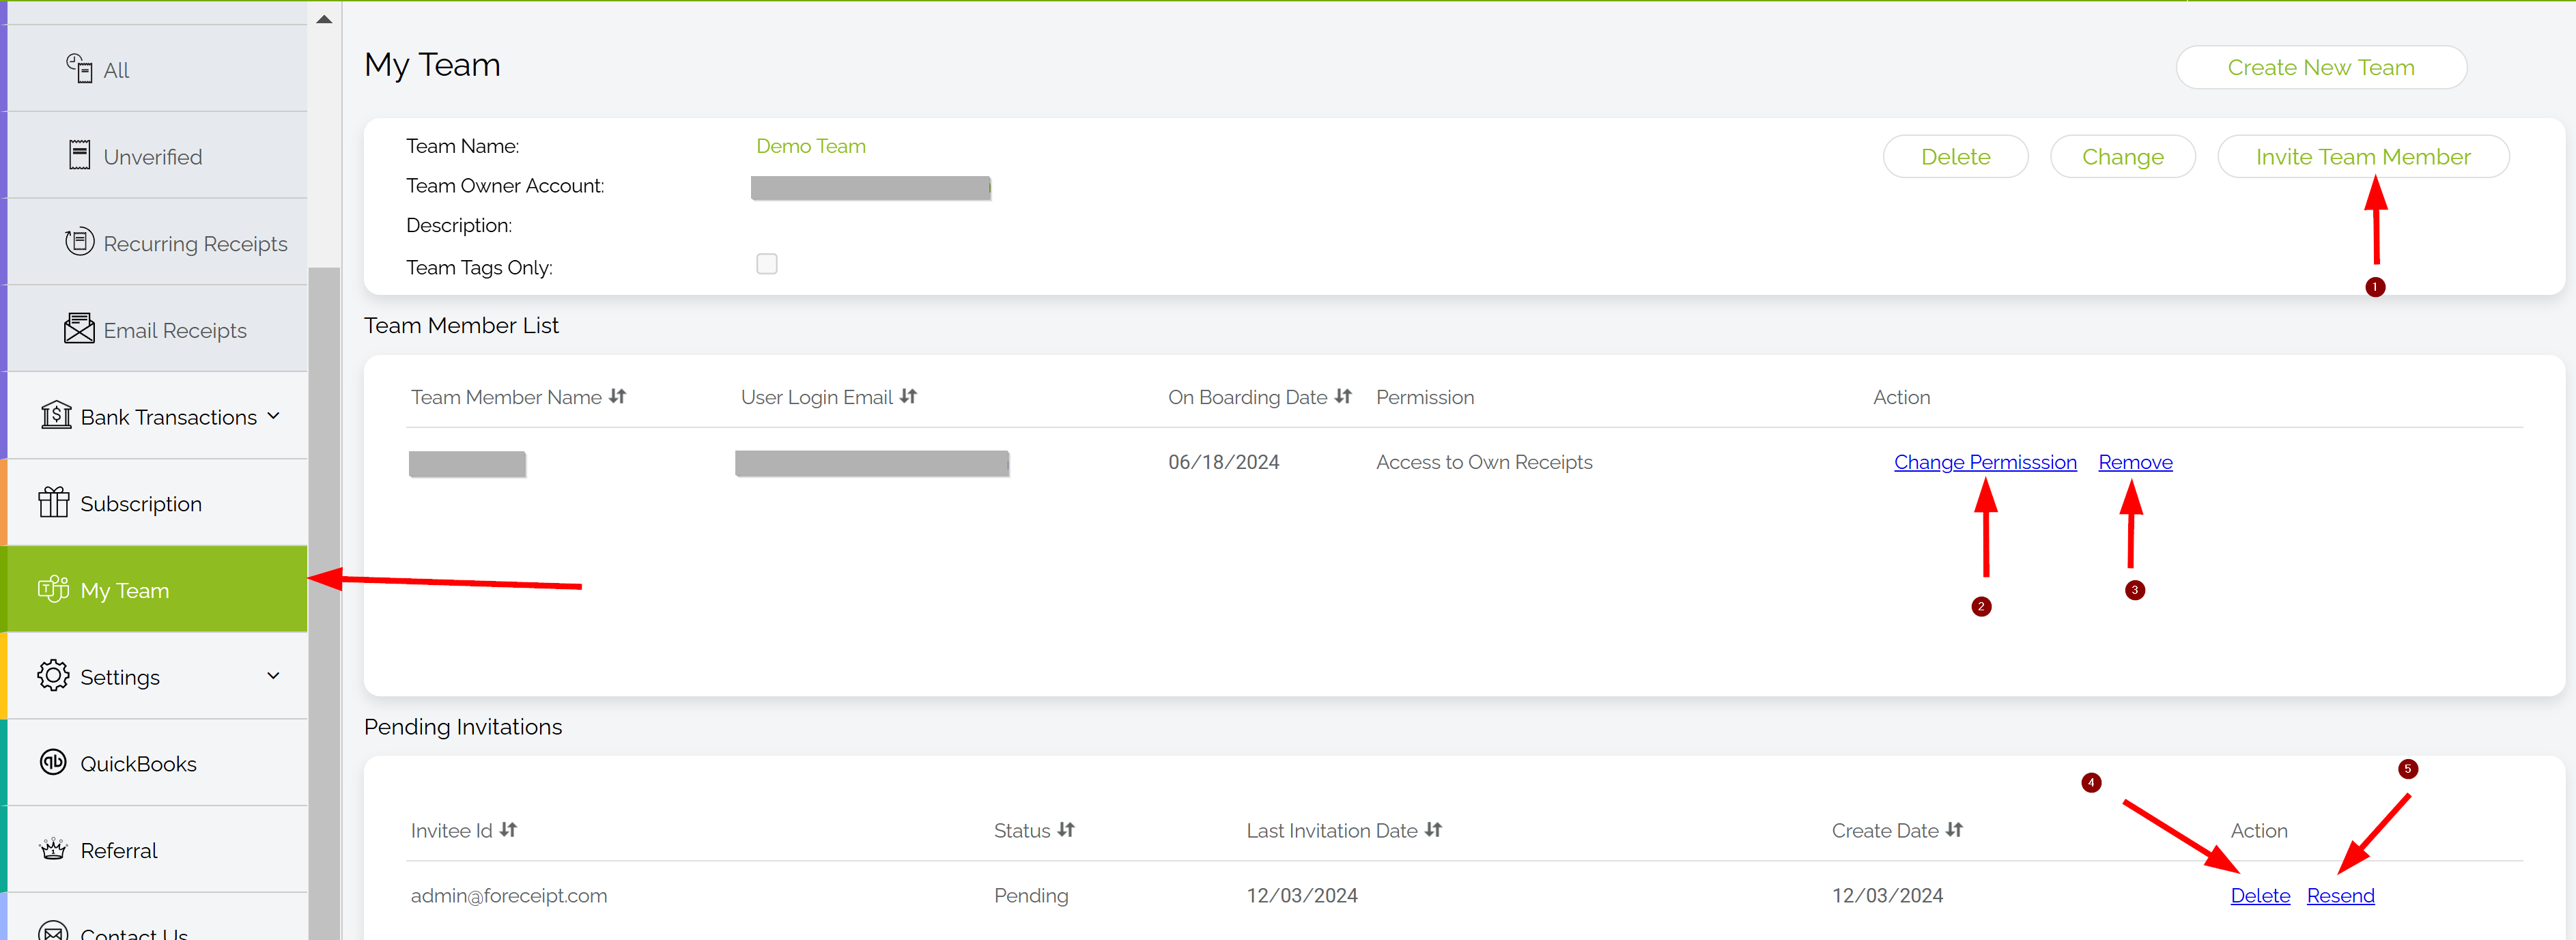
Sign in to the Foreceipt web portal and go to the "My Team" section from the main menu to begin your setup.
2. Invite Members
On the "Members" page, click "Invite", enter their email, and assign a permission level.
3. Members Join the Team
Your invitees receive an email—once they accept it or sign in via the portal, their receipts start syncing to the team automatically.
4. Manage Your Team
Admins have full control (best managed on the web portal):
- Invite or remove members
- Adjust permissions: Own-only, View All, Edit All, or Manage Team
- Resend or cancel invites
Even if a member is removed, their past receipts remain in the team's record.
5. Understand Access Levels
| Role | Access Description |
|---|---|
| Admin | Full control — manage team, categories, accounts, and receipts |
| Edit All | View and edit all receipts (cannot manage team or settings) |
| View All | View all receipts, plus manage their own |
| Member | Only access and manage personal receipts |
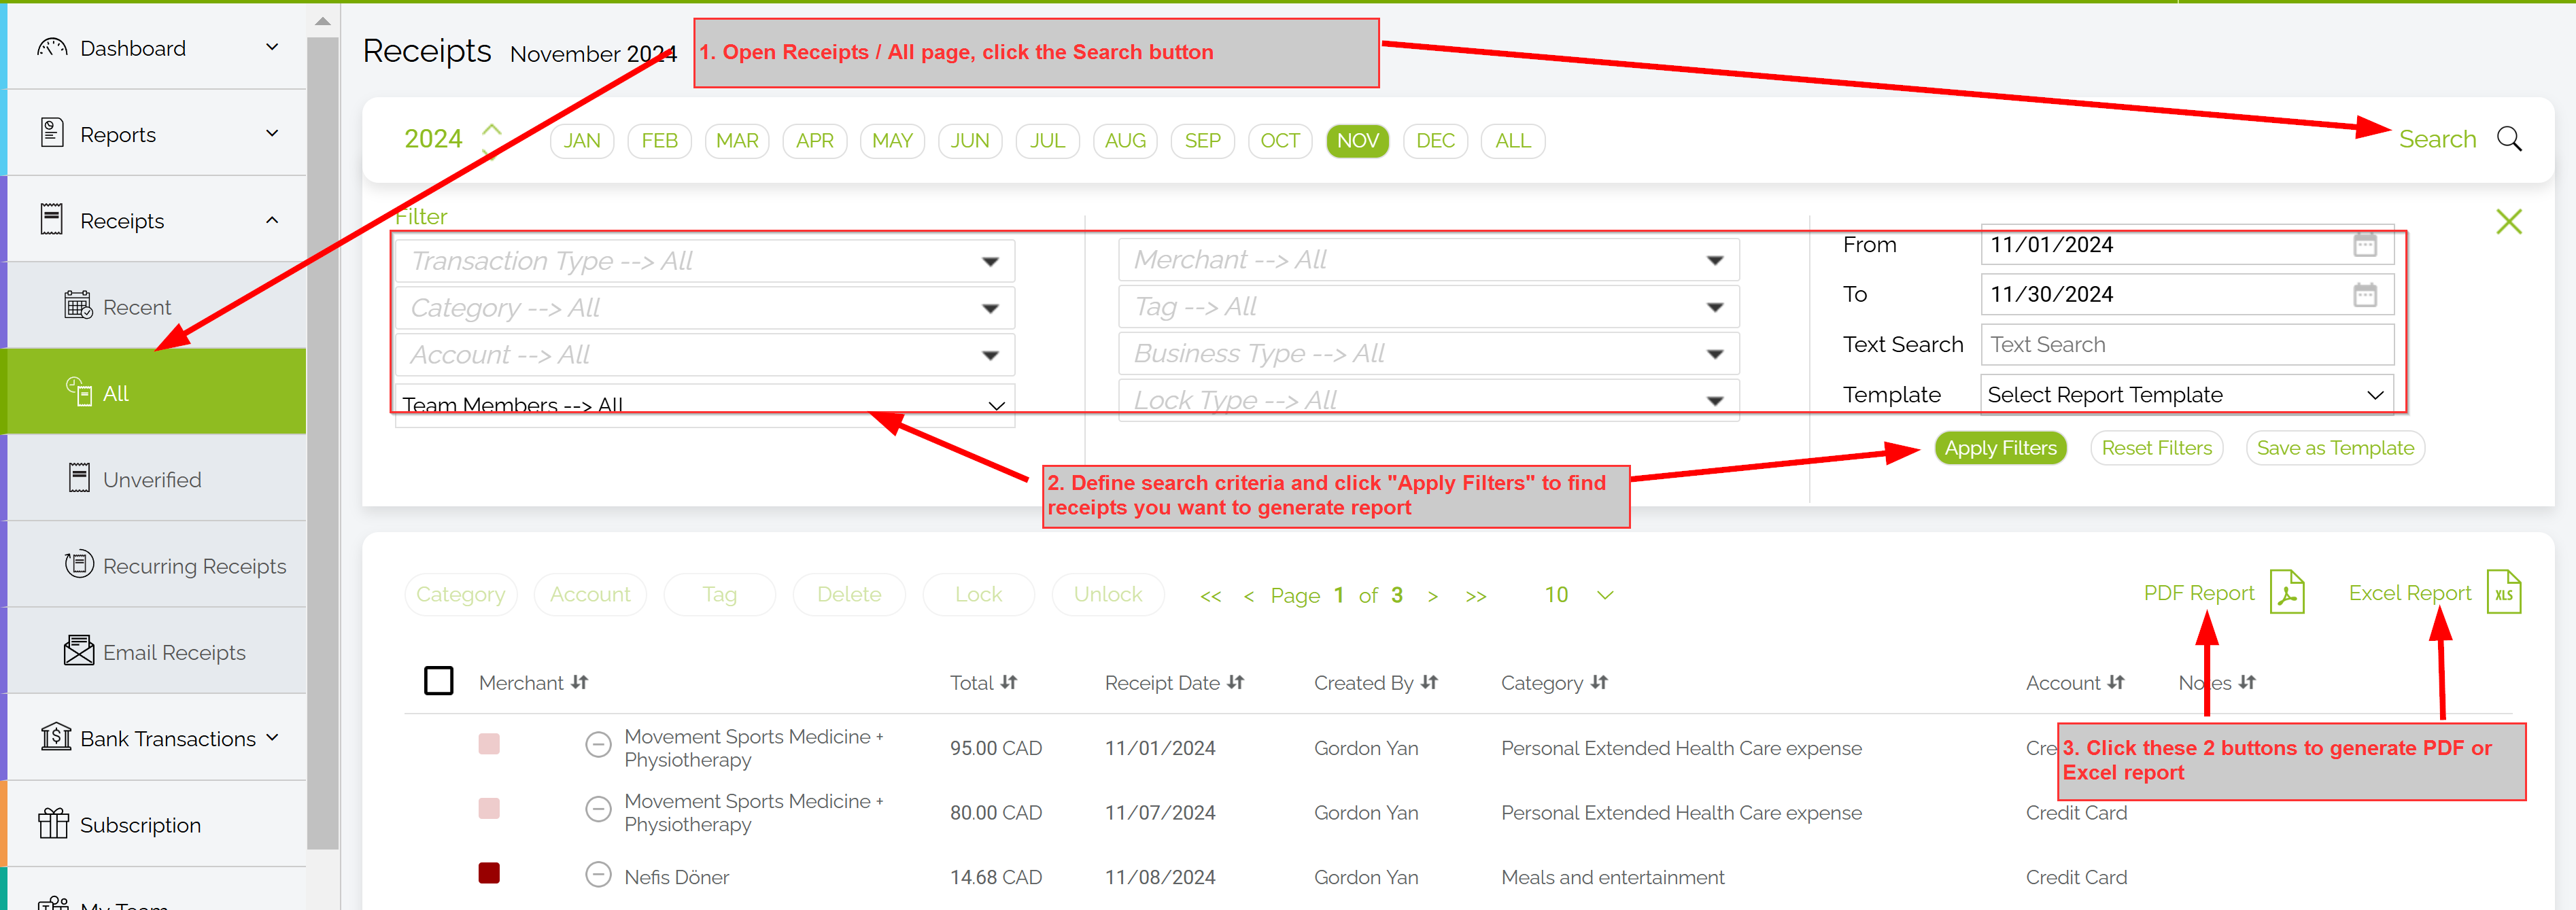
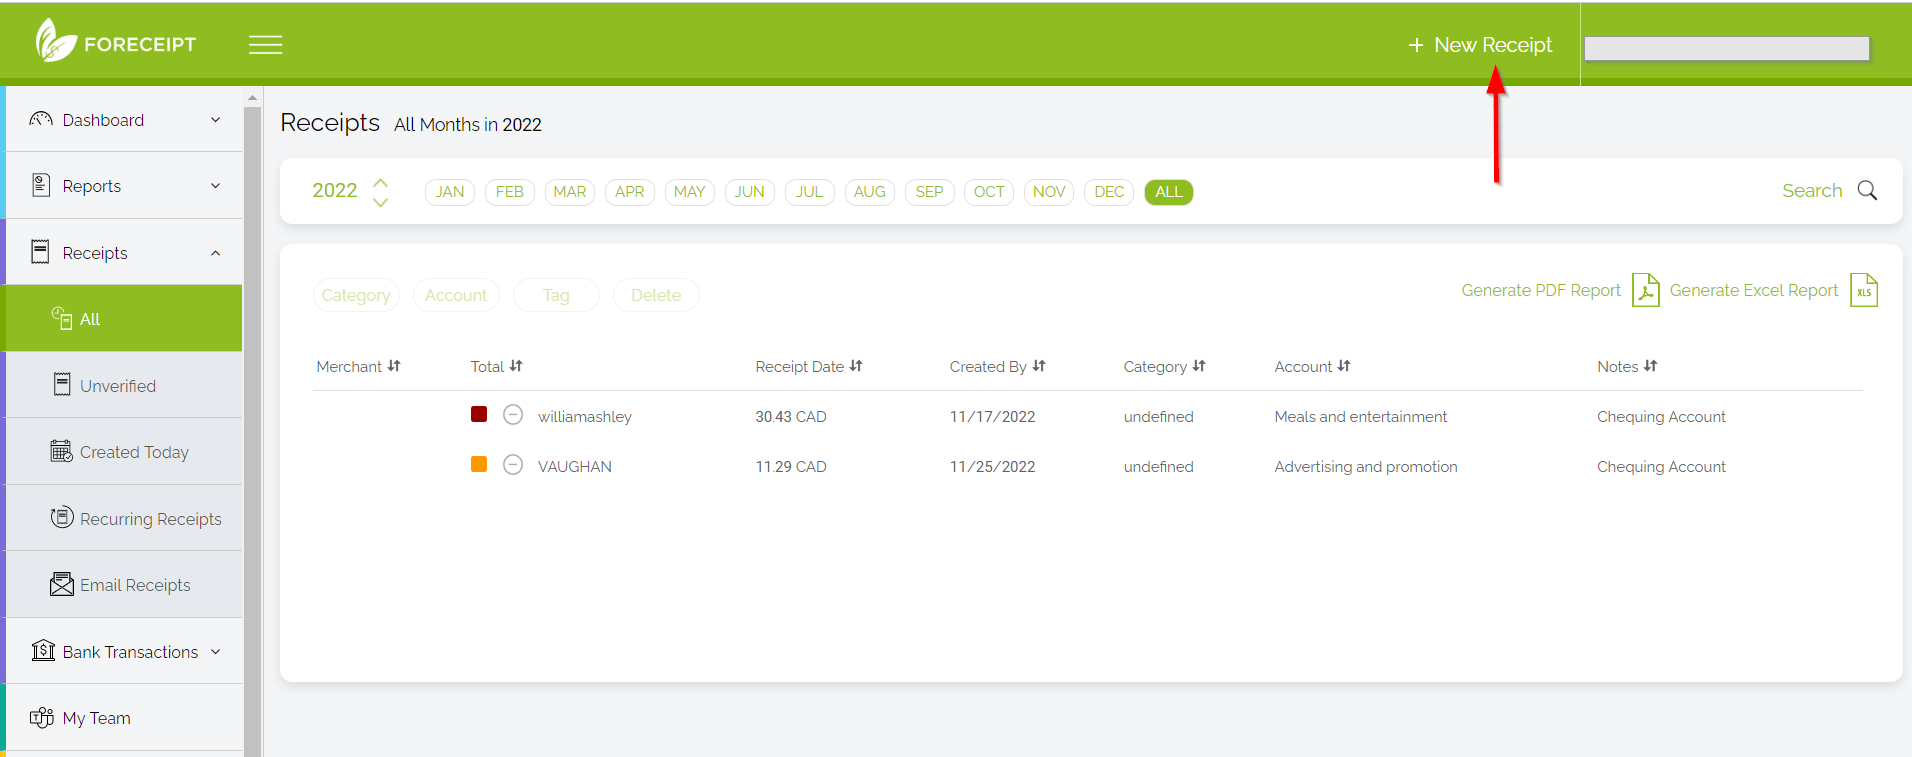
6. Generate Team Reports
Users with Admin, Edit All, or View All access can generate reports combining all team receipts. This can be done via the Reports tab or from the Receipts → All view in the web portal.
Best Practice
For smooth collaboration, use the Foreceipt web portal whenever possible. The bigger screen and intuitive layout make team management far easier compared to mobile. Use the mobile app mainly for adding receipts on the go.
Foreceipt allows Canadian users to track multiple taxes (e.g., GST, PST, QST and HST) separately for each receipt. This feature is particularly useful for businesses in Canada that need to report taxes individually for accurate accounting and compliance.
Recommended: Watch the Video Tutorial
60-second video: How to Enable Multiple Taxes Tracking for Canadian UsersThis video walks you through the entire process step by step and is the easiest way to learn.
— or —
Step-by-Step Guide
Follow the written steps below if you prefer reading or need a quick reference.
🛠️ How to Enable Multiple Taxes Tracking
- Access Settings:
- Open the Foreceipt mobile app.
- Tap the menu icon (☰) in the top-left corner.
- Select "Settings" from the menu.
- Enable Multiple Taxes:
- In the Settings menu, find and tap on "Taxes".
- Toggle the option "Enable Multiple Taxes Tracking" to ON.
- Configure Tax Rates:
- After enabling, you'll be prompted to enter the tax rates applicable to your region.
- Input the GST, PST, and/or HST rates as required.
- Save your settings.
📄 How to Apply Taxes to a Receipt
- Scan or Add a Receipt:
- Capture a new receipt using the "Scan" feature or manually add a receipt.
- Review Tax Amounts:
- While editing the receipt details, you'll see fields for each tax category (e.g., GST, PST). If you are scanning a receipt, the amount for each tax category is usually automatically populated.
- Review the amounts and make necessary corrections if needed.
- Save the Receipt:
- Once all details are entered, save the receipt.
- The taxes will be tracked separately, and you can view them in your reports.
Recommended: Watch the Video Tutorial
1-minute: How to Search and Find Any Receipt QuicklyThis video walks you through the entire process step by step and is the easiest way to learn.
— or —
Step-by-Step Guide
Follow the written steps below if you prefer reading or need a quick reference.
🧭 Search by Filters
- Navigate to the Receipts All screen.
- Click the Filter icon to open the filter options.
- Define your search criteria, such as:
- Merchant Name
- Category
- Payment Method
- Date Range
- Tags
- Click Apply Filters to view the filtered results.
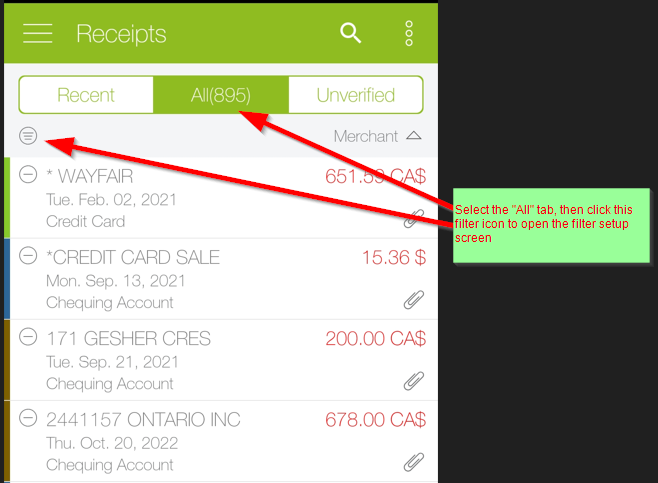
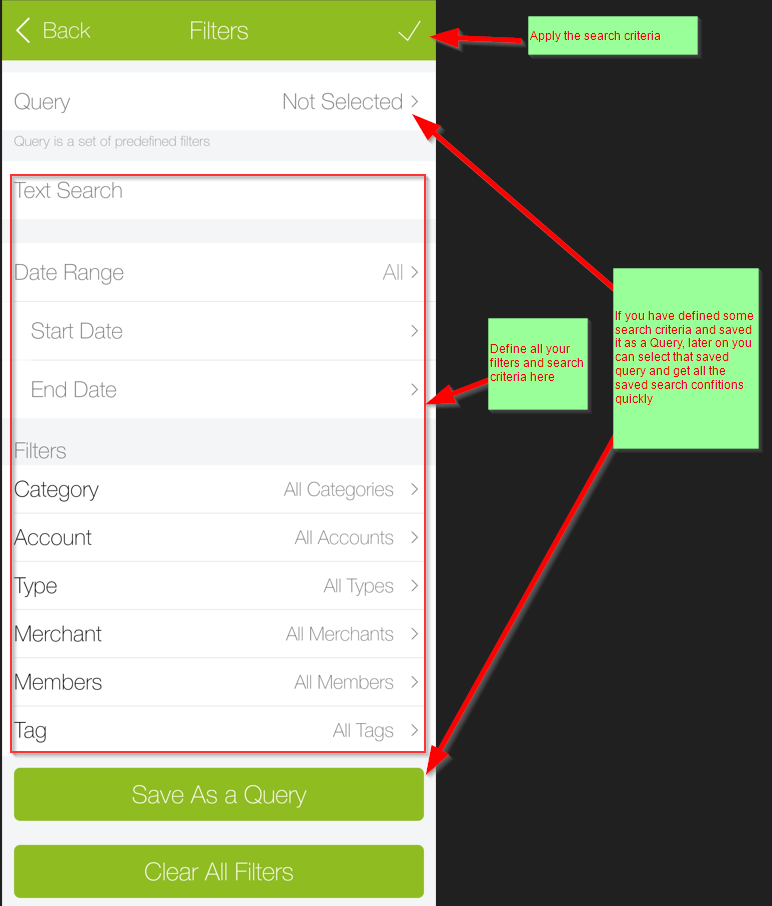
This method is ideal for narrowing down receipts based on specific attributes.
🔎 Search by Keywords
- Go to the Receipts All screen.
- Use the Search Bar at the top.
- Enter any information you remember about the receipt, such as:
- Merchant Name
- Total Amount
- Category
- Payment Method
- Tag
- Press Enter or click the Search Icon to view the results.
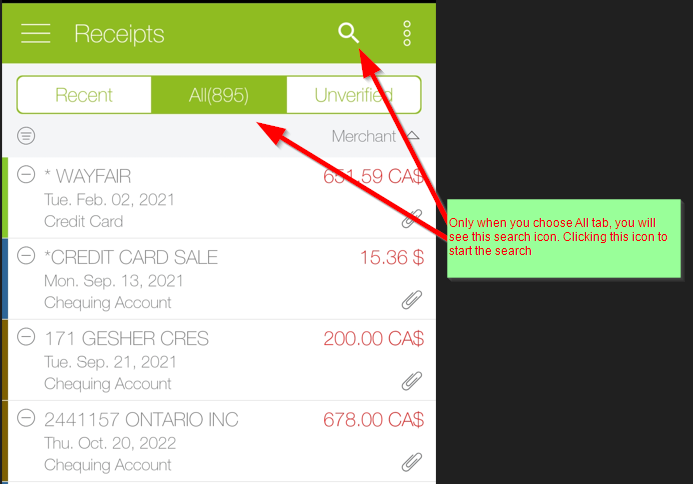
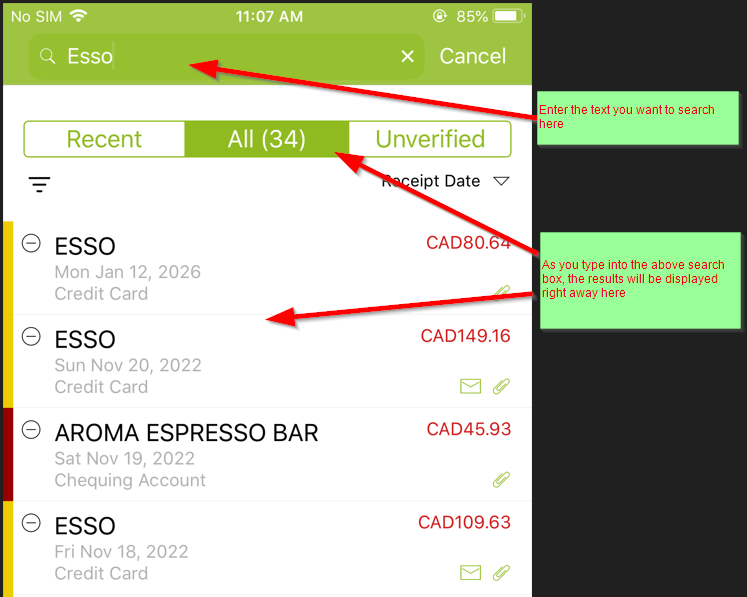
This method is useful for quick searches when you recall specific details about a receipt.
💡 Tips for Efficient Searching
- Use Specific Keywords: The more specific your search terms, the more accurate your results will be.
- Combine Filters and Keywords: For more refined searches, use both filters and keywords together.
- Regularly Tag Receipts: Tagging receipts with relevant keywords can make future searches more efficient.
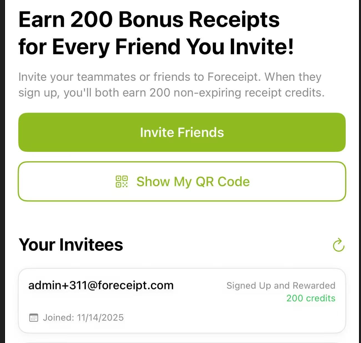
You can refer to a friend from both app and the web portal.
What You'll Receive
Invite a friend to Foreceipt, and both of you will earn 200 bonus receipt credits once they sign up using your invitation. Bonus credits never expire!
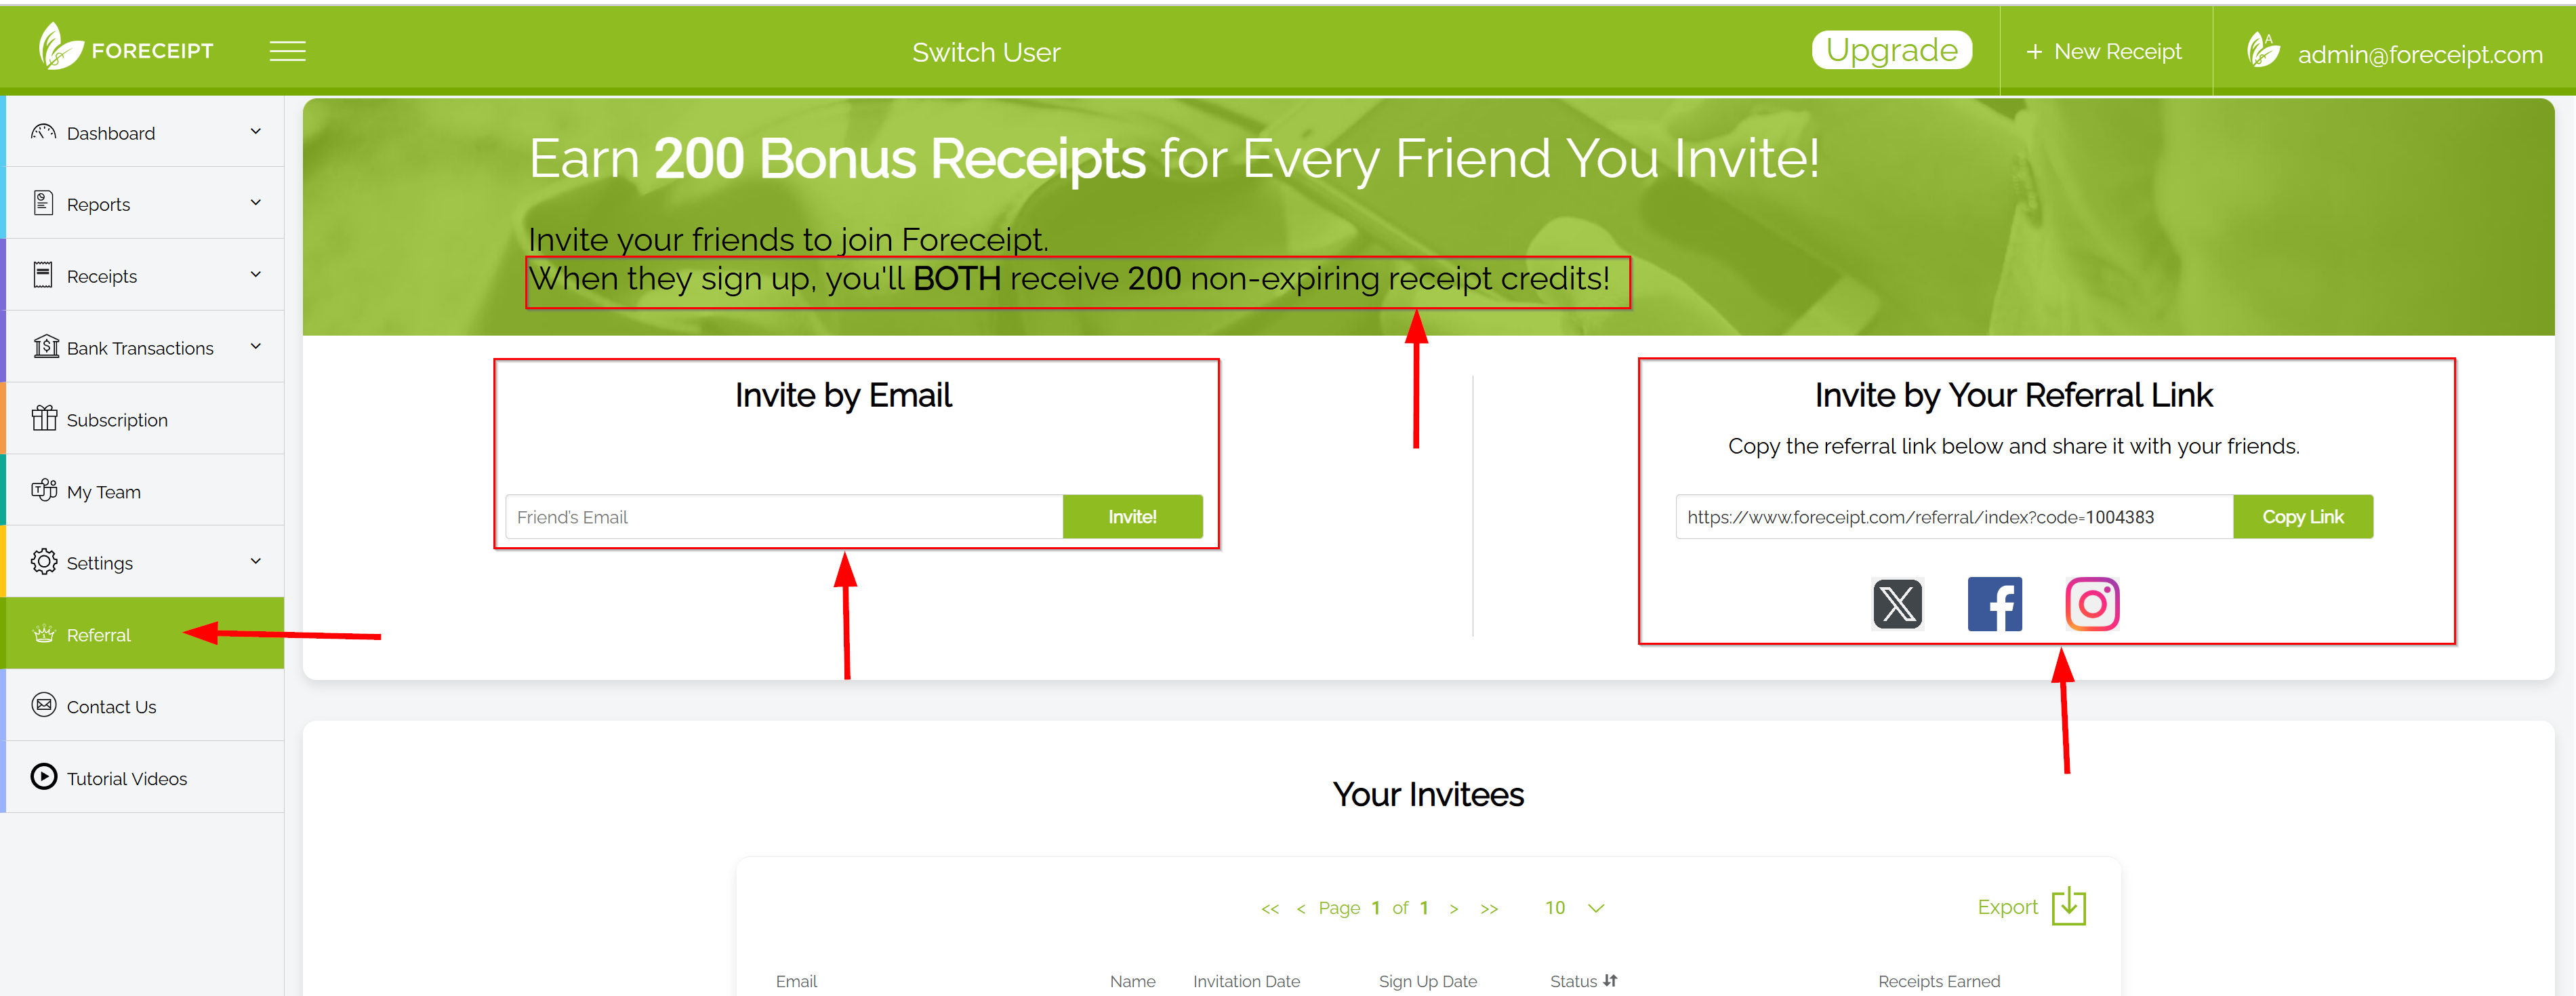
How to Refer a Friend from the App
- Open the side menu and choose Referral
- Choose one of two ways to invite:
- Send via Email
- Enter your friend's email address and click Invite.
- Once they click "Accept Invitation Now" and register, you'll both receive 200 bonus receipt credits.
- Share Your Referral QR Code
- Copy your Referral QR Code and share it directly or on social media.
- When someone signs up by scanning that QR code, both of you will receive the same 200 credits.
- Send via Email
Why Use It?
- Rewarding: Get free credits you can use for scanning or expense tracking—at no cost.
- Effortless: A few clicks or a simple QR code share, and you're done.
- Unlimited Potential: There's no limit to how many people you can invite or bonus credits you can earn.
Quick Summary Table
| Referral Method | What You Do | Result |
|---|---|---|
| Email Invitation | Send invite via Referral page | Both you and friend get 200 credits |
| Referral QR Code | Share your QR code publicly or privately | Both you and new user get 200 credits |
Recommended: Watch the Video Tutorial
1-minute: How to Customize Your Settings from the web portalThis video walks you through the entire process step by step and is the easiest way to learn.
— or —
Step-by-Step Guide
Follow the written steps below if you prefer reading or need a quick reference.
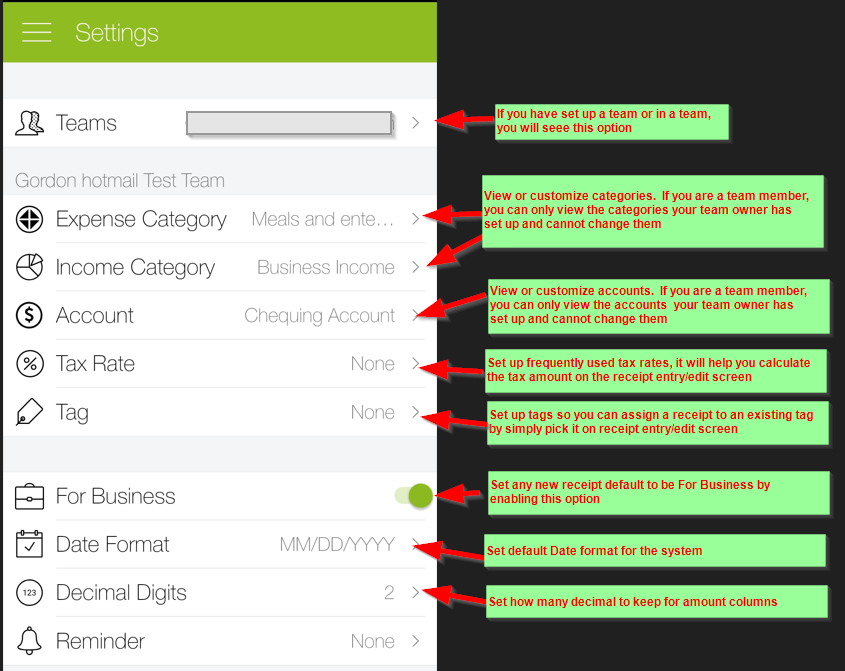
You can also view and edit some of your settings directly from the app:
- Open the Foreceipt mobile app.
- Tap the menu icon (☰) in the top-left corner.
- Select "Settings" from the menu.
🛠️ Customizable Settings From the App
Foreceipt offers various settings to tailor the app to your needs:
- Categories: Set default category when scanning or entering a new receipt.
- Accounts: Set default account when scanning or entering a new receipt.
- Tax Rates: Set up tax rates for easy tax amount entry when scanning or entering a new receipt.
- Currency: Choose your default currency for new receipt and reports.
- Tag: Set up tag list.
- Business or Personal: Default new receipt to be Business or Personal receipt.
- Date Format: Set date display format.
- Decimal Digits: Set how many decimal to keep for amount display.
Yes, both the IRS and the Canada Revenue Agency (CRA) accept scanned or digital images of receipts as valid proof of purchase, provided certain conditions are met.
US IRS Guidelines on Scanned Receipts
The IRS has permitted the use of scanned receipts for tax purposes since 1997. To ensure acceptance, scanned receipts must:
- Be identical to the original paper receipts.
- Maintain a high degree of legibility and readability.
- Be accurately stored in a secure, accessible, and readable electronic format.
- It's advisable to store scanned receipts in a well-organized system, such as a cloud-based storage service.
Canada CRA Guidelines on Scanned Receipts
The CRA accepts scanned receipts as valid records, provided they:
- Are accurate reproductions of the original paper documents.
- Are stored in an accessible and readable electronic format.
- Meet the CRA's imaging and retention rules, which include ensuring that the digital image captures all information on the receipt.
✅ Best Practices for Storing Scanned Receipts
To ensure your scanned receipts are accepted by both the IRS and CRA:
- Capture Clear Images: Ensure that the entire receipt is visible and legible, including any small print.
- Organize Receipts by Category and Date: Categorize receipt and capture transaction date properly for easy retrieval.
- Store Securely with Foreceipt: Foreceipt stores all images in Amazon cloud securely, with a comprehensive backup plan. Your receipts are accessible from anywhere on any device and are kept for up to 7 years.
Yes, the majority of merchants accept scanned images of receipts for refunds or returns, provided certain conditions are met.
✅ Conditions for Accepting Scanned Receipts
To ensure your scanned receipt is accepted:
- Include Essential Information: Ensure the scanned image includes key details such as the barcode or reference number, date of purchase, and total amount.
- Maintain Legibility: The scanned image should be clear and legible, capturing all relevant information without distortion.
📱 Advantages of Using Scanned Receipts
- Convenience: Easily access and manage your receipts from anywhere, eliminating the need to store physical copies.
- Organization: Quickly search and find the receipts, making returns and exchanges more efficient.
- Security: Reduced risk of losing receipts, as digital copies can be securely stored and backed up.
We're here to assist you! Depending on your needs, please use the appropriate contact method below:
🛠️ For Application Support
- Email: Please send your inquiries to help@foreceipt.io.
- Important: To ensure we can assist you promptly, please use your Foreceipt login email when sending your message. If your email address differs, we'll kindly ask you to resend your inquiry using your login email.
💼 For Business or General Inquiries
- Email: Reach out to support@foreceipt.com for questions related to partnerships, press, or general information.
New to Foreceipt on the web?
The quickest way to understand what you can do is to watch the short
video below.
Recommended: Watch the Web Introduction Video
2-minute video: Foreceipt web app key features overviewThis quick video walks you through all the core features of the Foreceipt web version in under 2 minutes and is the best place to start.
— Optional —
Looking for the Mobile App?
If you're using Foreceipt mobile app, you may also want to watch:
2-minute video: Foreceipt mobile app key features overviewThis video covers the main features available in the mobile app.
You can access the Foreceipt web portal at foreceipt.com. Use the same email you use to log into the Foreceipt mobile app—no extra account needed.
When to Use the Web Version
Foreceipt's web version unlocks a more spacious interface and powerful features that make managing expenses easier. Here's when you'll want to use it:
- Customize settings fast — Easily adjust categories, accounts, and exchange rates.
- Process receipts in bulk — Upload and scan multiple PDFs or image files at once.
- Automate recurring expenses — Set receipts to generate automatically.
- Import bank data — Upload transactions via CSV or PDF bank statements directly.
- Download receipt images — Export your receipt image files quickly.
- Manage your team — Invite members, control permissions, and oversee activity.
- Sync with QuickBooks Online — Seamless integration to stay synced with your accounting.
- Control your subscription — Subscribe, upgrade, or cancel effortlessly online.
- Find receipts instantly — Search by date, merchant, tag, or any custom criteria.
- Refer Foreceipt to your friends — Invite your friends to sign up with Foreceipt and get rewarded.
Tip: The web portal is your go-to choice when you need to manage settings, perform bulk actions, import bank transactions, integrate with QuickBooks Online, or get detailed oversight of your expenses. The mobile app is perfect for quick scanning and on-the-go updates—but the web version offers that extra layer of control and flexibility.
Recommended: Watch the Video Tutorial
2-minute: How to customize Category, Account & Currency settingThis video walks you through the entire process step by step and is the easiest way to learn.
— or —
Step-by-Step Guide
Follow the written steps below if you prefer reading or need a quick reference.
1. Log In to the Web Portal
Go to
foreceipt.com, and sign in using the same email and
password you use in the mobile app.
2. Navigate to Settings
From the left side menu, access
the Settings page. Here you'll find the sections for
Categories, Accounts, and Exchange
Rates.
3. Customize Categories
- Easily add new categories aligned with your business needs.
- Use built-in IRS and CRA categories—or create your own for greater flexibility.
4. Add or Adjust Accounts
- Define account names such as "Operating Account" or "Credit Card."
5. Set Up Exchange Rates
Exchange rate settings are always defined as how much of a foreign currency equals 1 USD. Foreceipt uses this internally to convert between currencies.
For example:
- If you set 1.4 CAD = 1 USD and 0.85 EURO = 1 USD, the system will calculate that 1 EURO = 1.647 CAD.
- If your default currency is CAD, all EURO expenses will automatically be converted into CAD in your reports using this rate.
💡 Tip: Always set exchange rates relative to 1 USD. Foreceipt will handle all cross-currency conversions automatically in your reports.
Why Customize These Settings?
- Tailor Foreceipt to your workflow — structure it around your actual expense habits.
- Ensure proper categorization and reporting, especially helpful during tax season.
- Handle multi-currency effortlessly, all within one platform.
Quick Recap
| Feature | What You Can Do |
|---|---|
| Categories | Add, edit, or utilize preset categories (IRS/CRA) |
| Accounts | Define financial accounts |
| Exchange Rates | Set custom currency rates to work with foreign expenses |
Recommended: Watch the Video Tutorial
2-minute: How to Generate Excel & PDF ReportsThis video walks you through the entire process step by step and is the easiest way to learn.
— or —
Step-by-Step Guide
Follow the written steps below if you prefer reading or need a quick reference.
What You Can Do
- Access Anywhere
Generate both Excel and PDF reports from the mobile app or web portal. For a smoother experience, especially on larger screens, we recommend using the web version. - Easy to Share
Once your report is ready, you'll receive an email with a download link. Perfect for forwarding to your accountant for tax prep—or to your employer for reimbursements.
What's Included in Each Format
| Format | Content Highlights |
|---|---|
| Excel | Includes receipt summaries, detailed entries, and clickable links to receipt images. Great for tax prep or deeper analysis. |
| Contains embedded receipt images along with summary and detail information. Ideal for sharing and reimbursement tasks. |
Note: Total amounts in reports are always shown in your default currency, even if individual receipts are in their original foreign currencies. To ensure accurate conversions, be sure to set up your exchange rates first.
How to Create a Report in the Web Portal
Log in to the web portal at foreceipt.com. Go to Receipts → All and initiate the report in three simple clicks.
Once requested, check the Requested Reports page to download your report. You'll also receive a notification via email.

Want to Reuse the Same Report Format?
Click New Report to open the template setup view.
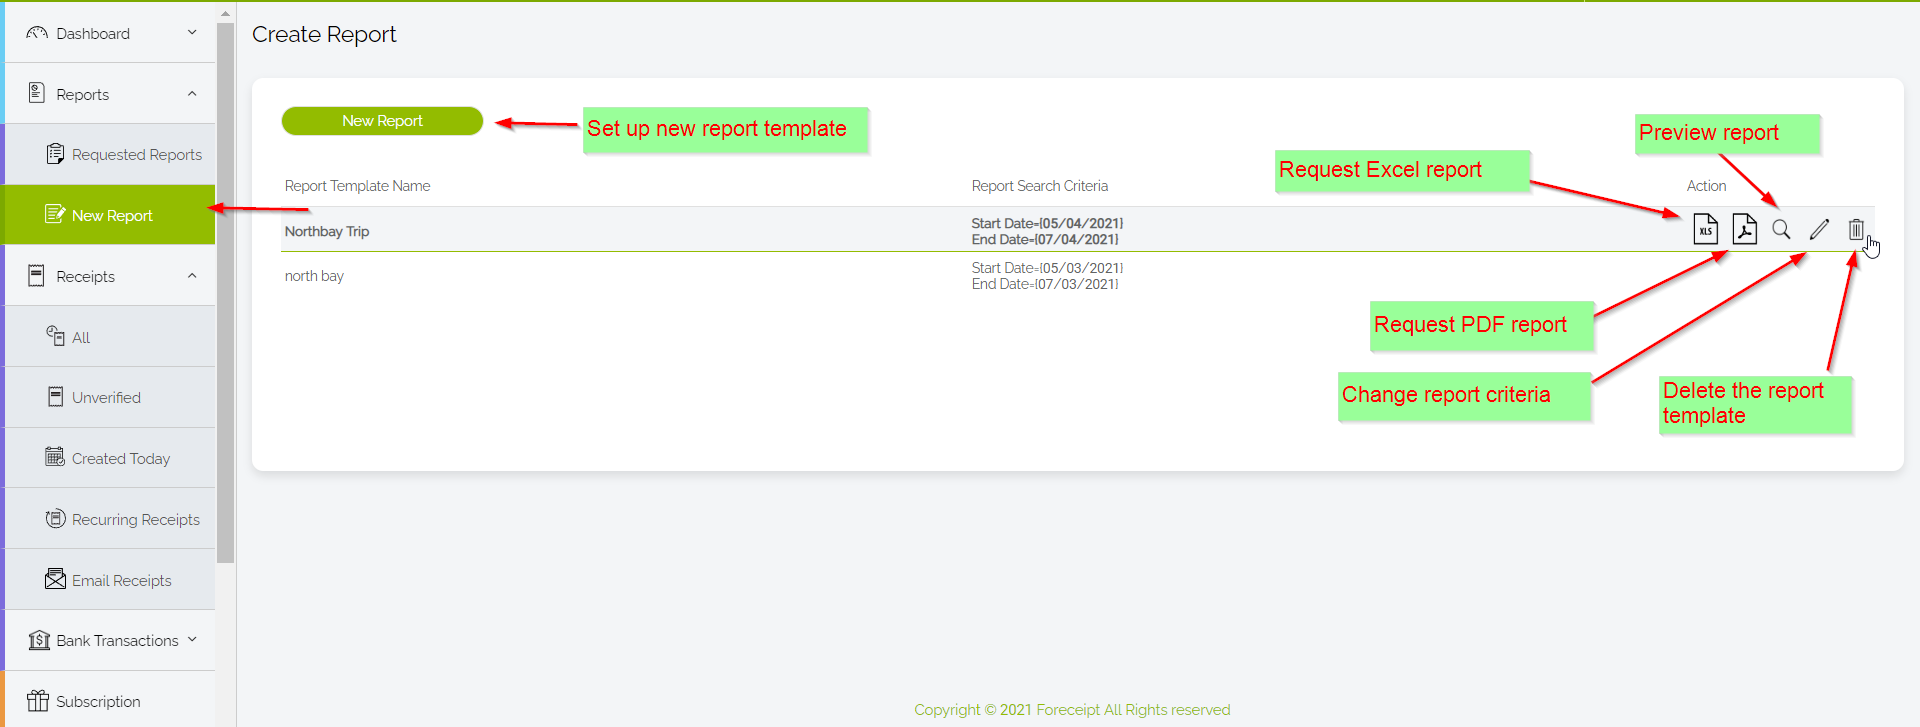
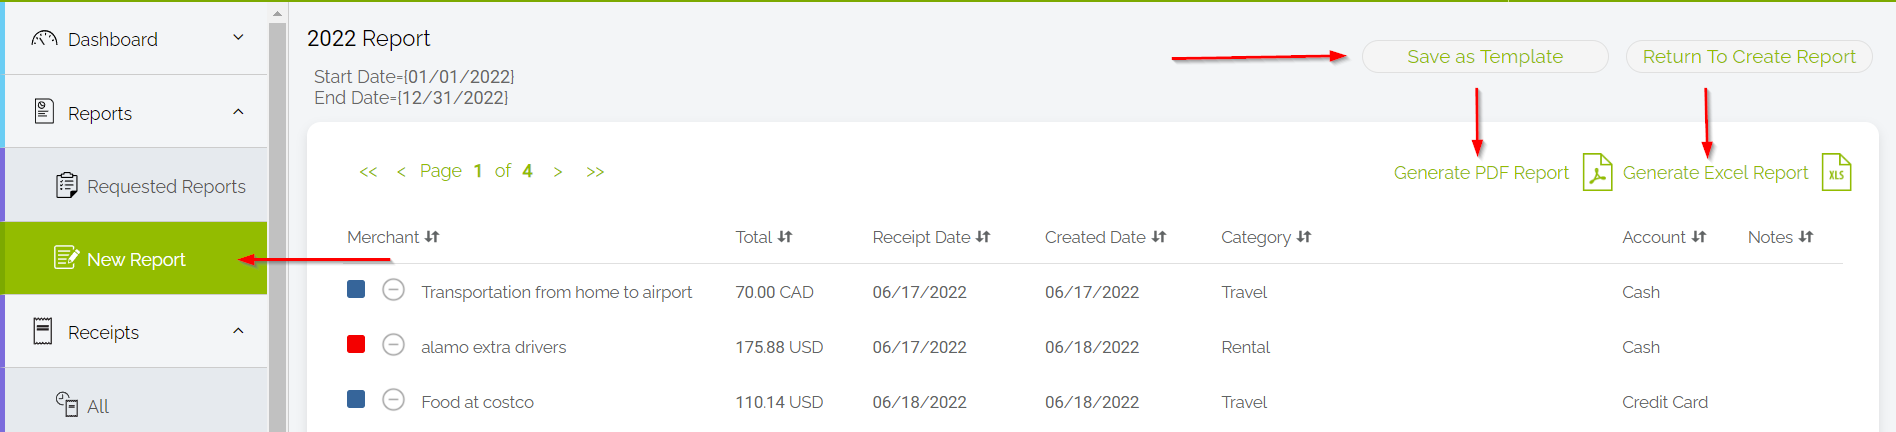
Click Add Report, define your criteria (like date range, receipt date vs. created date), name your template, then Save or Save & Preview.
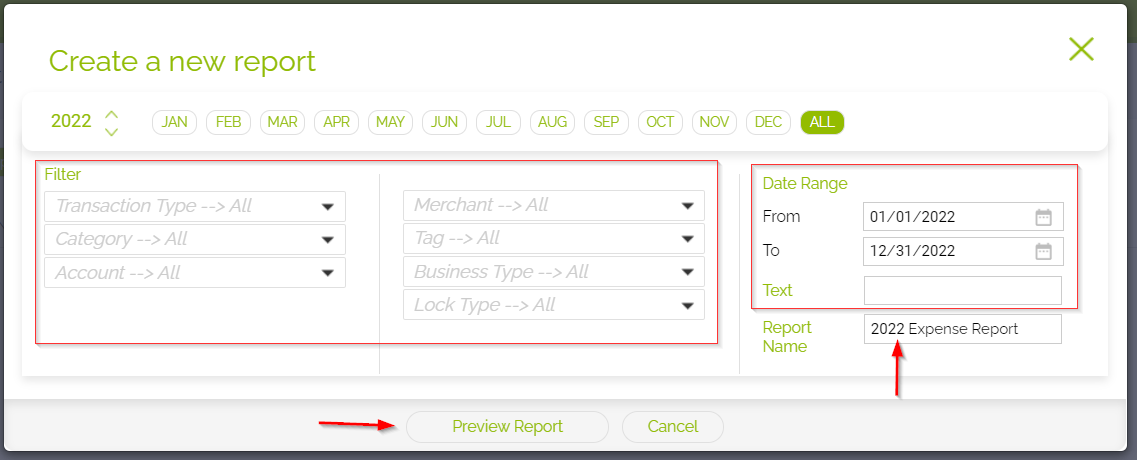
In preview mode, you can run the report immediately in Excel or PDF—or save it as a template for later use.
Quick Tip
- Use the web portal for its superior layout and control.
- Save report templates for fast, repeat access to commonly used filters or date ranges.
- Confirm your default currency and exchange rates are set correctly before generating reports with mixed currencies.
You have two simple options for getting your receipt images:
1. PDF Report
All receipt images are embedded directly
within the PDF report. It's a convenient option if you need everything
bundled in one file.
2. Download Original Images via ZIP
Want the original
files? Use this method:
- Head to Receipts → All in the web portal.
- Search for the specific receipts you want.
- Click the "Image Download" (ZIP) icon to request a ZIP file containing the original images.

- Go to Reports → Requested Reports to monitor the ZIP file progress and download when ready.

Recommended: Watch the Video Tutorial
2-minute: How to Upload a Bank Transaction CSV FileThis video walks you through the entire process step by step and is the easiest way to learn.
— or —
Step-by-Step Guide
Follow the written steps below if you prefer reading or need a quick reference.
1. Export Your CSV from Your Bank
Save your transactions
as a CSV file from your bank or card provider.
2. Upload the CSV to Foreceipt
- Go to the Foreceipt web portal and log in.
- Navigate to the CSV upload tool and select your file.
The interface will then prompt you to map your columns:
- Specify which column contains the transaction
date, along with its format (e.g.,
MM/DD/YYYYorYYYY-MM-DD). - Identify the description column for merchants or transaction details.
- Define the amount column, clarifying whether it reflects only "money out," "money in," or both.
- Tip: Save your mapping for reuse—handy when uploading files from the same bank or card issuer.
- Specify which column contains the transaction
date, along with its format (e.g.,
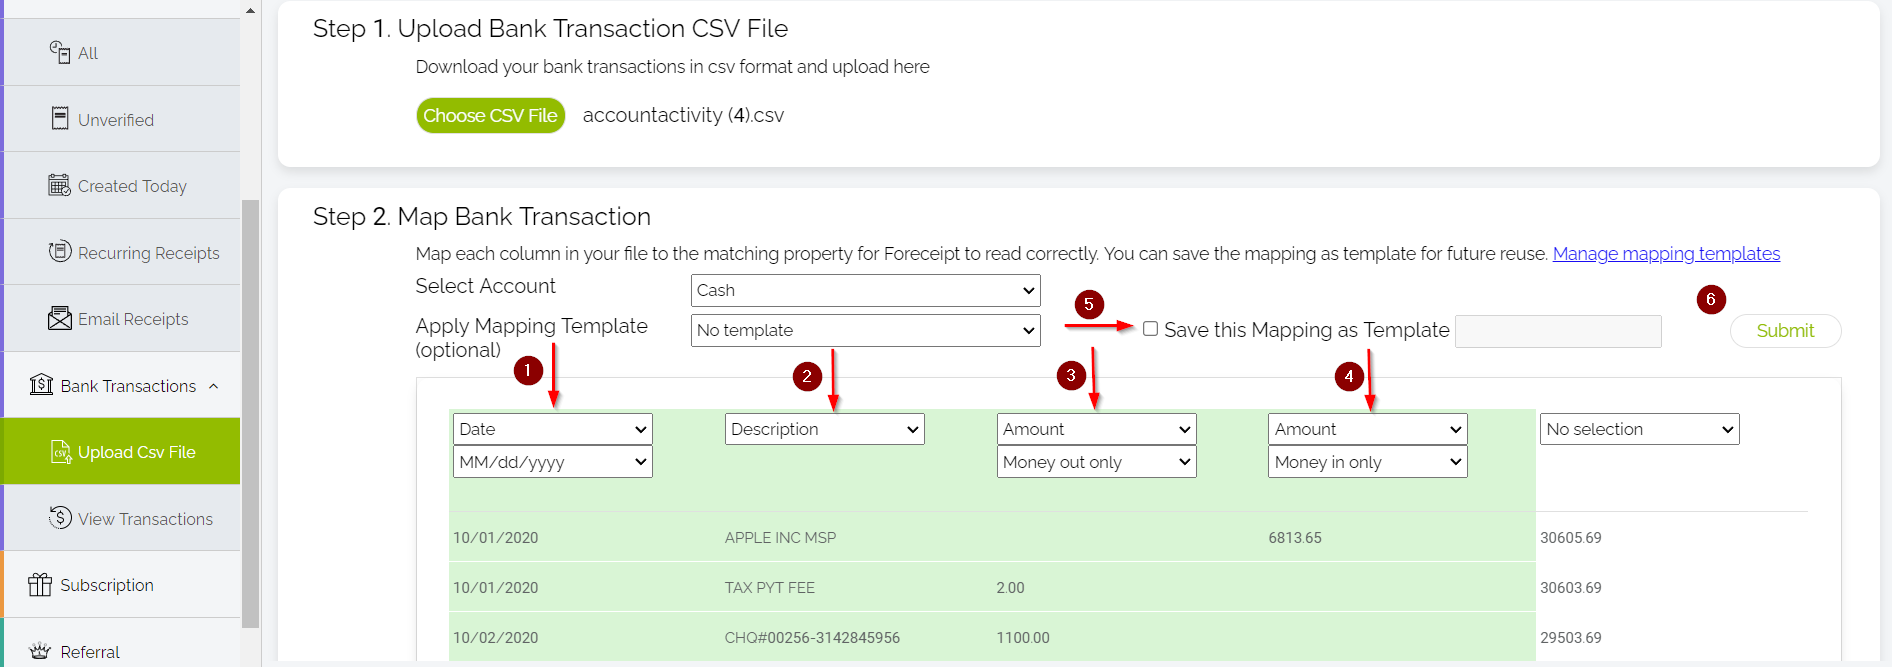
3. Review the Uploaded Transactions
After uploading,
you'll see all extracted transactions in a review screen:
- Any entry flagged with "Match Found in Foreceipt" means a duplicate may exist. Click "Yes" to inspect the match—if it's indeed a duplicate, you can delete or skip it.
![]()
4. Add Transactions to Foreceipt
- Select the transactions you wish to import and click "Add to Foreceipt."
- On the next page, you can edit merchant names or categories—either individually or in bulk.
- Click "Post to Foreceipt" to finalize. This action imports them as expenses or incomes and removes them from the pending list.
![]()
Why This Matters
- Avoid manual entry by uploading batches of transactions at once.
- Maintain accuracy with quick duplicate detection.
- Streamline your workflow using reusable mappings for repeat uploads.
Quick Overview
| Task | What to Do |
|---|---|
| Export | Download a CSV of transactions from your bank or credit card |
| Upload | Import the file via Foreceipt's web portal |
| Map Columns | Specify date, description, and amount columns; save mapping for future use |
| Review | Screen for duplicates and transaction details |
| Import & Finalize | Add selected items, adjust details, and post to Foreceipt |
Quickly convert your bank or credit card PDF statements into organized expenses or income entries in Foreceipt. This process helps auto-assign categories, identify potential duplicates, and streamline your financial tracking.
Recommended: Watch the Video Tutorial
2-minute: How to Process PDF Bank StatementsThis video walks you through the entire process step by step and is the easiest way to learn.
— or —
Step-by-Step Guide
Follow the written steps below if you prefer reading or need a quick reference.
1. Upload Your PDF Statement
Click on "Upload PDF
Statement" and select your bank or credit card PDF file.
2. Select the Associated Bank Account
Choose the bank
account that corresponds to the statement you're uploading.
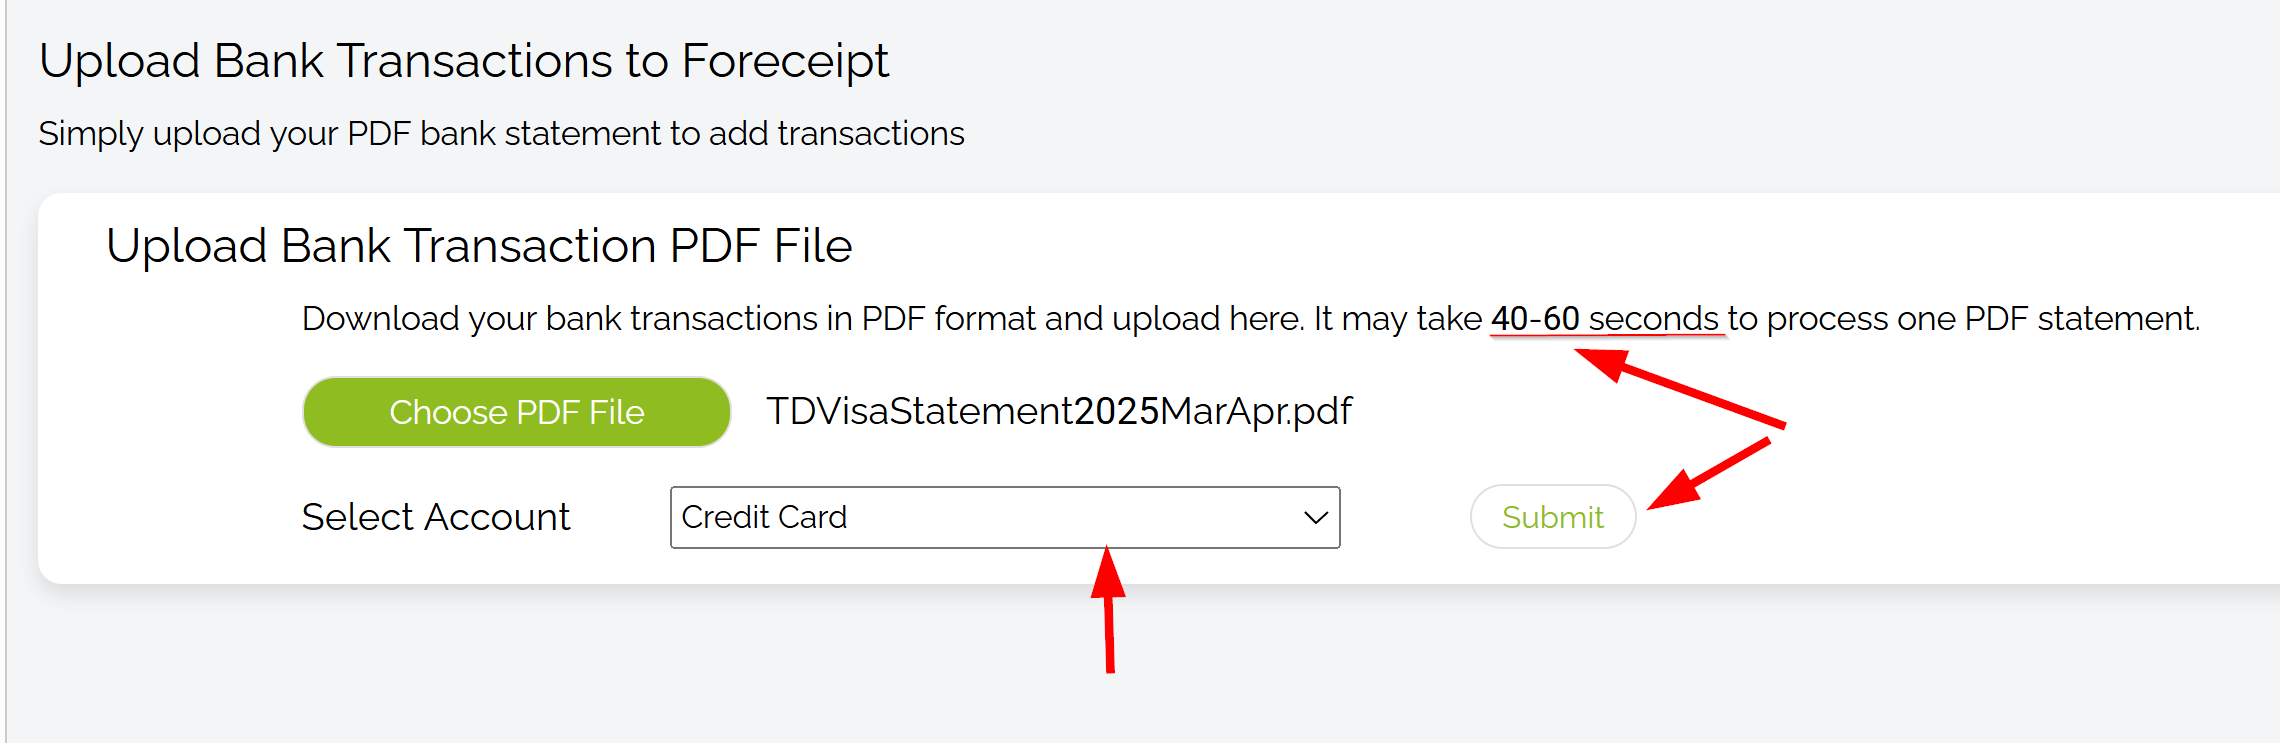
3. Review and Confirm Transactions
Once processed,
Foreceipt will display a list of transactions from the PDF. Each transaction
will have an auto-assigned category and a flag indicating potential
duplicates.
- Duplicate Detection: If a transaction matches an existing entry in Foreceipt, it will be flagged as "Match Found in Foreceipt." Click on the "Yes" link to view the matching transaction. If it's indeed a duplicate, you can choose to delete or ignore it.
![]()
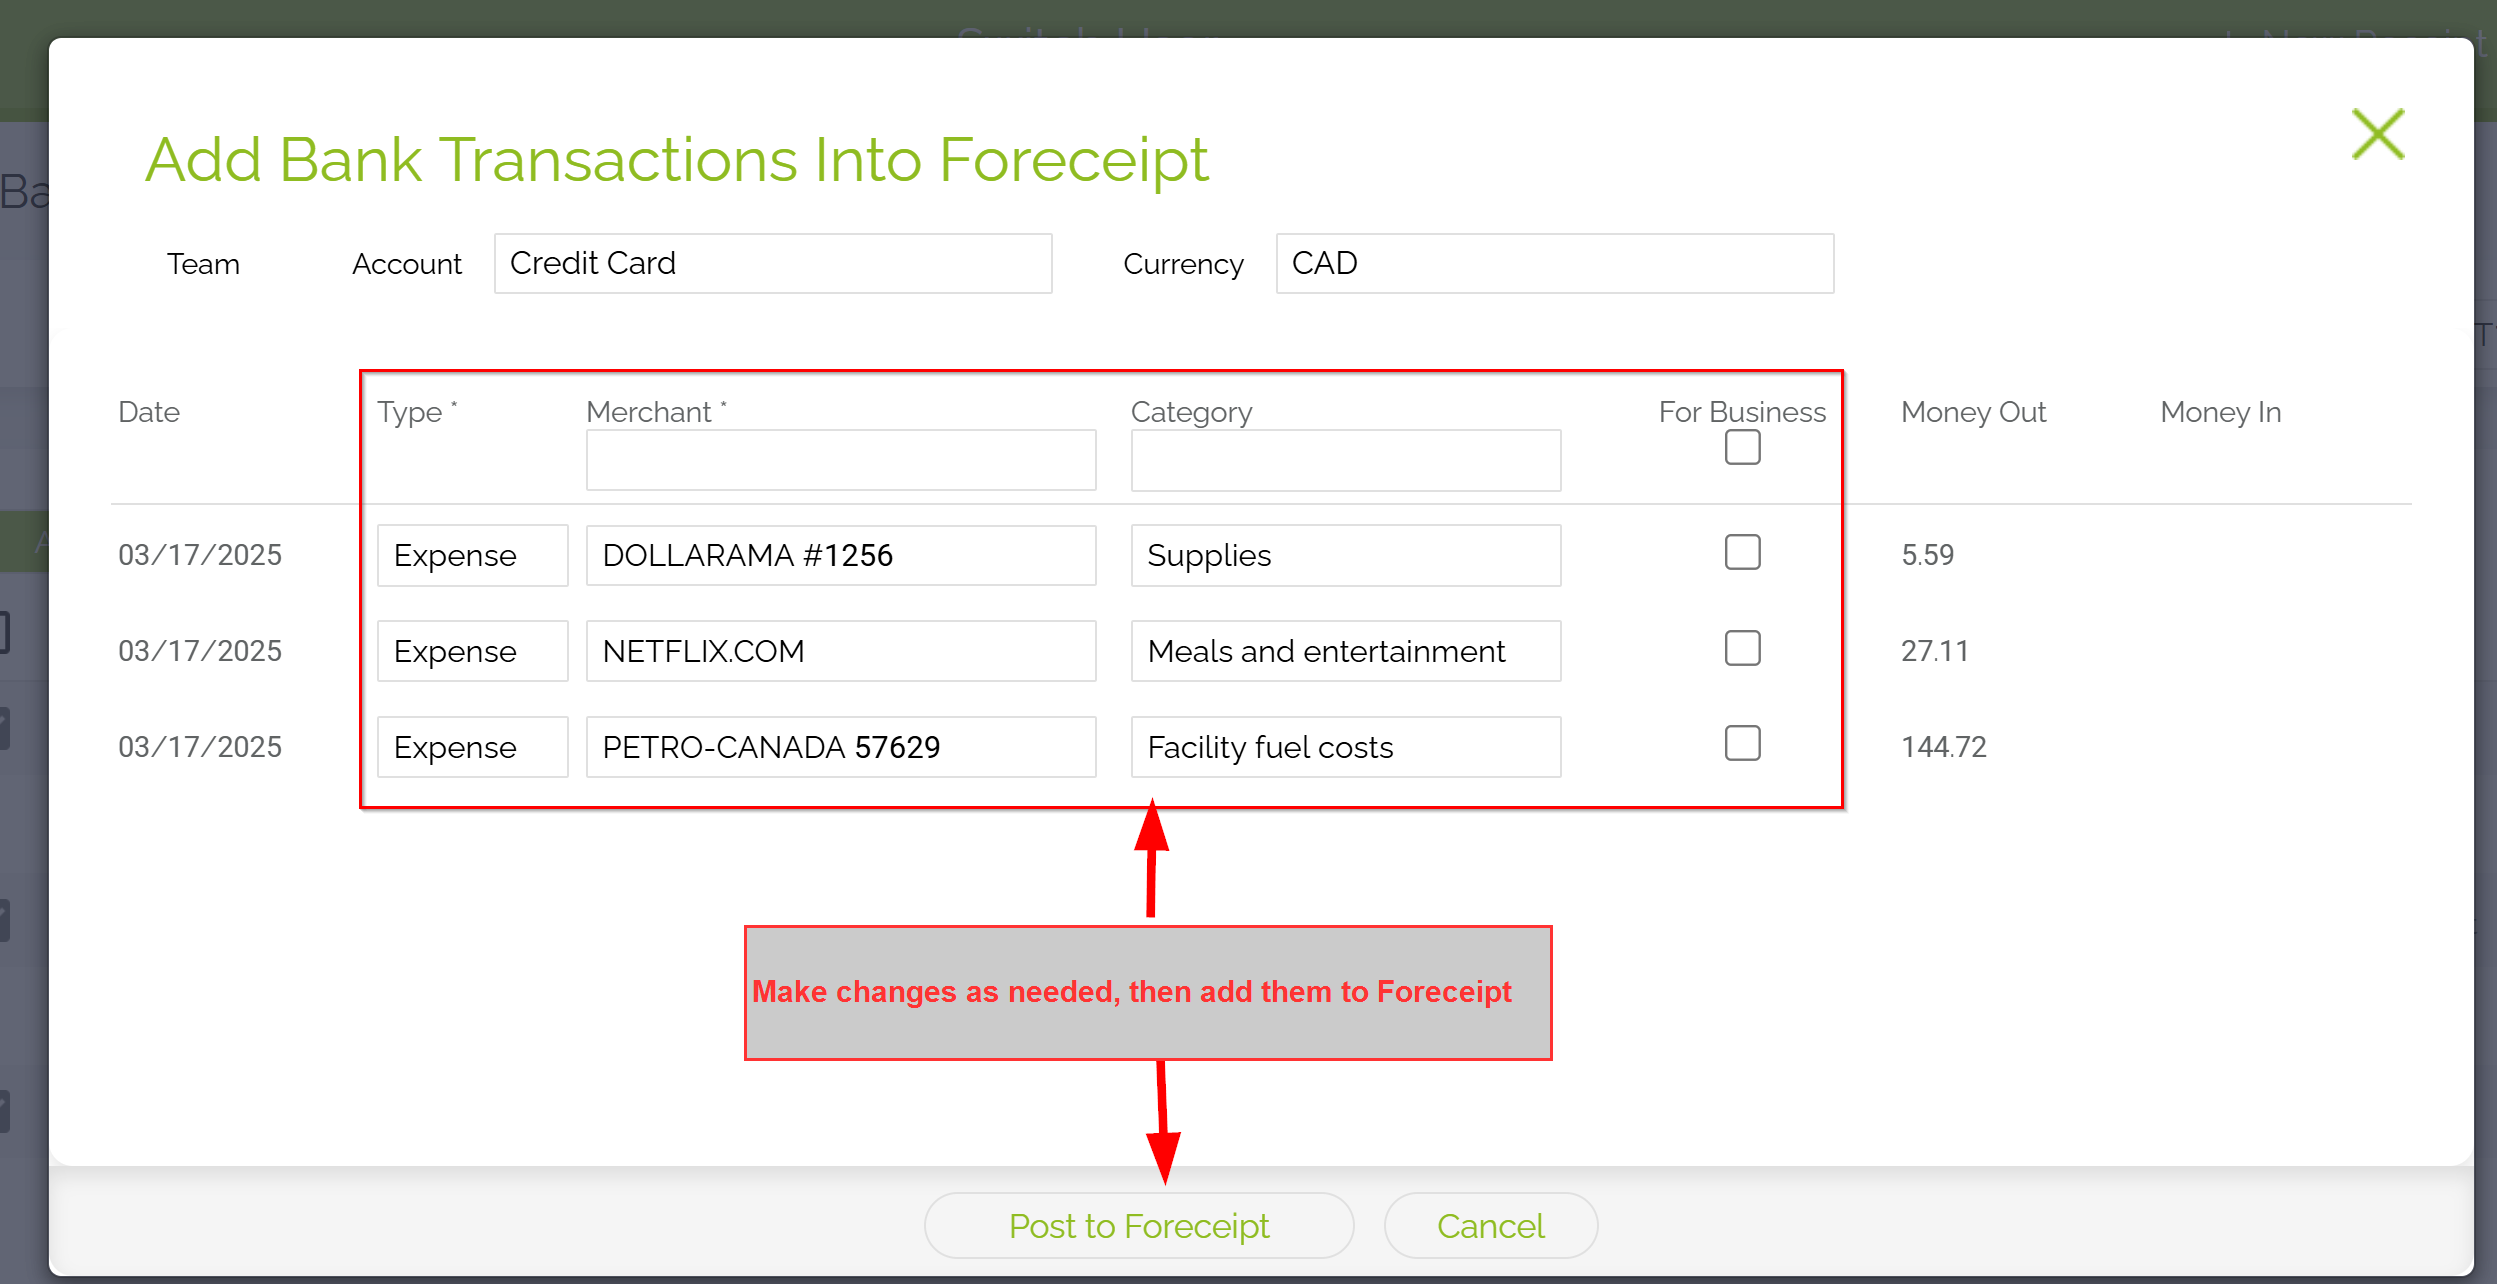
4. Add Transactions to Foreceipt
Select the transactions
you wish to add, then click "Add to Foreceipt." You can
make any necessary edits to the details before finalizing. Once added, these
transactions will be removed from the pending list.
Want to automate your routine expenses? With Foreceipt, you can schedule receipts to be generated on a recurring basis—perfect for regular bills like rent, subscriptions, or insurance.
Recommended: Watch the Video Tutorial
2-minute: How to Set Up a Recurring ReceiptThis video walks you through the entire process step by step and is the easiest way to learn.
— or —
Step-by-Step Guide
Follow the written steps below if you prefer reading or need a quick reference.
What Is a Recurring Receipt?
A recurring receipt is a scheduled instruction that automatically creates receipts at preset intervals. For example:
- Set up a $80 monthly home insurance expense from
Jan 1, 2018 to Dec 31, 2018.
- On save (assuming it's January 1 or later), Foreceipt generates the first $80 expense.
- On February 1 and again on March 1, monthly entries are created automatically.
Once active, these recurring entries appear in both the web and mobile versions of Foreceipt.
How to Set It Up
- Log in on the Web Portal
Open foreceipt.com (recurring receipts can only be created or updated via the web) - Add a New Receipt
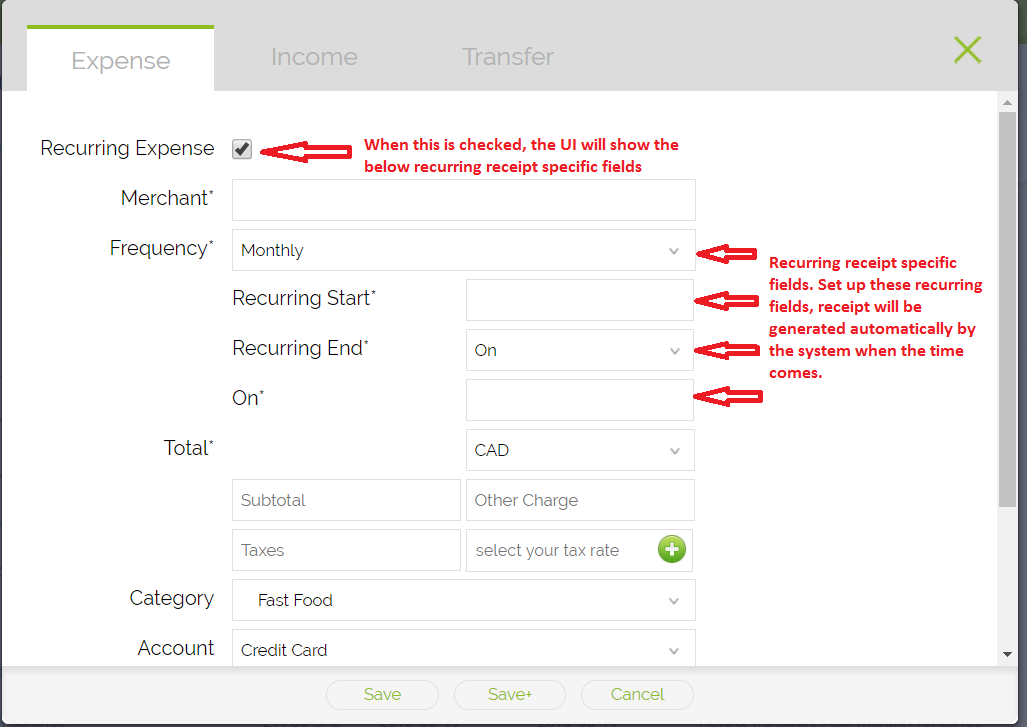
Click "+ New Receipt" and fill in the amount, category, merchant, and dates as needed. - Enable Recurrence
In the receipt form, check the "Recurring Expense" box to schedule the receipt to repeat. - Set Dates and Schedule
Define:- Start Date — when the first recurring entry should appear.
- End Date — when to stop generating automatic
entries.
(If today is on or after the start date, the first auto-entry will appear immediately.)
- Save Your Settings
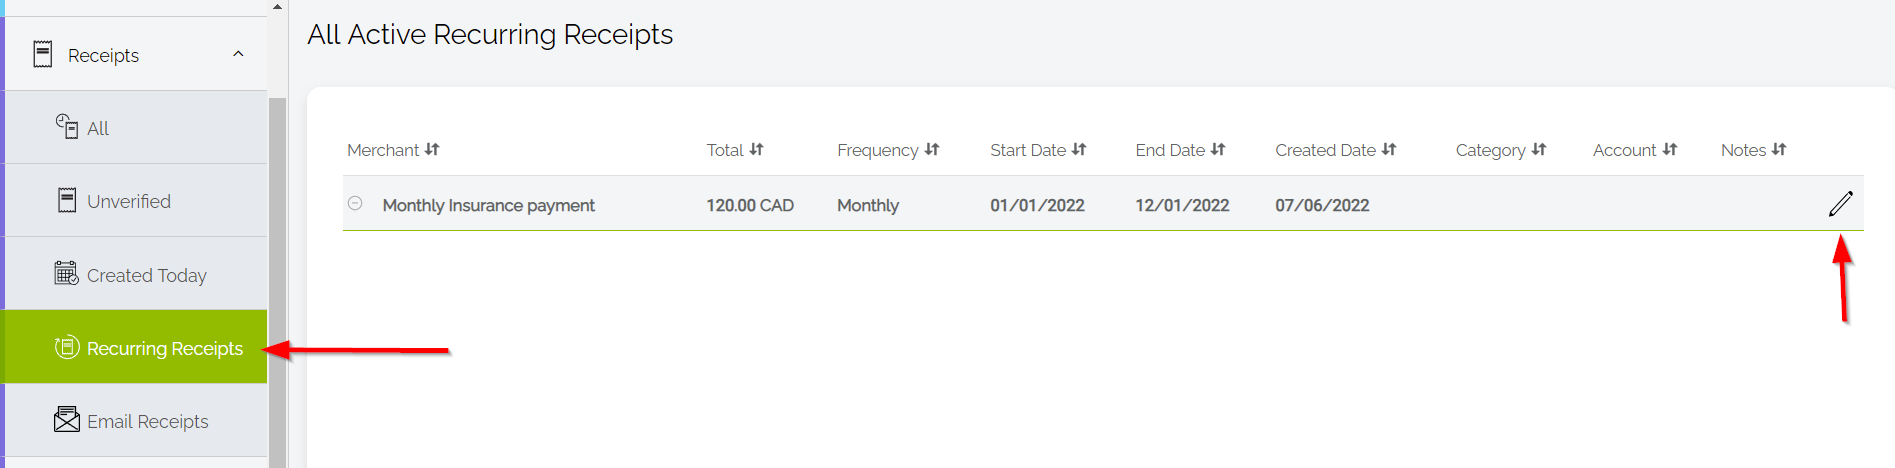
Once saved, Foreceipt will generate the first entry (if applicable) and continue to create receipts at each interval you specified. - View and Manage Recurring Receipts
Go to the Recurring Receipts page to see all active series. From here, you can:- View or edit schedule details. If the start date is in the past, you cannot change, please simply delete it and create a new one.
- Pause or delete recurring instructions
Why Use Recurring Receipts?
- Convenience: Say goodbye to repetitive manual entry for regular expenses.
- Consistency: Ensure every repeating expense is captured, even when unnoticed.
- Synchronization: Automatically aligns entries across both mobile and web platforms.
Quick Reference Table
| Task | What to Do |
|---|---|
| Access | Log into the web portal at foreceipt.com |
| Create | Add a new receipt and check "Recurring Expense" |
| Schedule | Set start and end dates for auto-generation |
| View/Manage | Visit Recurring Receipts page to edit, pause, or delete schedules |
| Benefit | Automate routine entries and maintain consistency across devices |
Recommended: Watch the Video Tutorial
1-minute: How to Scan PDF & Image Files in BulkThis video walks you through the entire process step by step and is the easiest way to learn.
— or —
Step-by-Step Guide
Follow the written steps below if you prefer reading or need a quick reference.
- Log in to the Web Portal
Go to foreceipt.com and sign in using your existing Foreceipt credentials. - Open the Bulk Upload Tool
From any page, click "+ New Receipt" located in the top-right corner—this will open the bulk scanning interface.
- Upload PDFs or Image Files
Drag and drop your receipt files (PDFs or images) or click to select them. The system will process the batch for you.
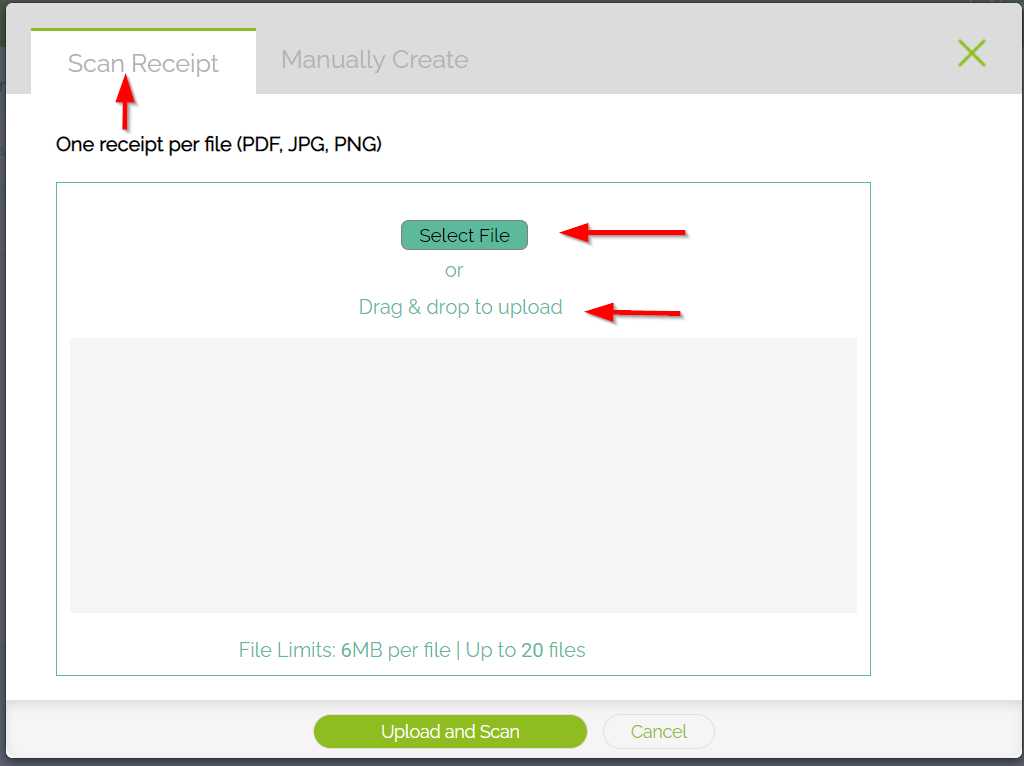
- Review and Confirm
Once uploaded, Foreceipt will scan each receipt—extracting details like date, merchant, and amount for your review.
Why Use Bulk Upload?
- Save time: Upload multiple receipts in one go, instead of individually.
- Effortless digitization: PDFs and images are automatically processed for you.
- Convenient review process: Batch mode simplifies editing and confirmation.
Recommended: Watch the Video Tutorial
4-minute: How to Integrate with QuickBooks OnlineThis video walks you through the entire process step by step and is the easiest way to learn.
— or —
Step-by-Step Guide
Follow the written steps below if you prefer reading or need a quick reference.
How It Works
- Once linked, Foreceipt automatically imports your QBO Chart of Accounts (both categories and accounts), ensuring consistency across platforms.
- Existing receipts in Foreceipt keep their original category and account assignments. You can choose to update them to the newly imported QBO options if needed.
Step-by-Step Setup
1. Verify Your Plan
Make sure you're on the Business plan—this feature is exclusive to Foreceipt Business users.
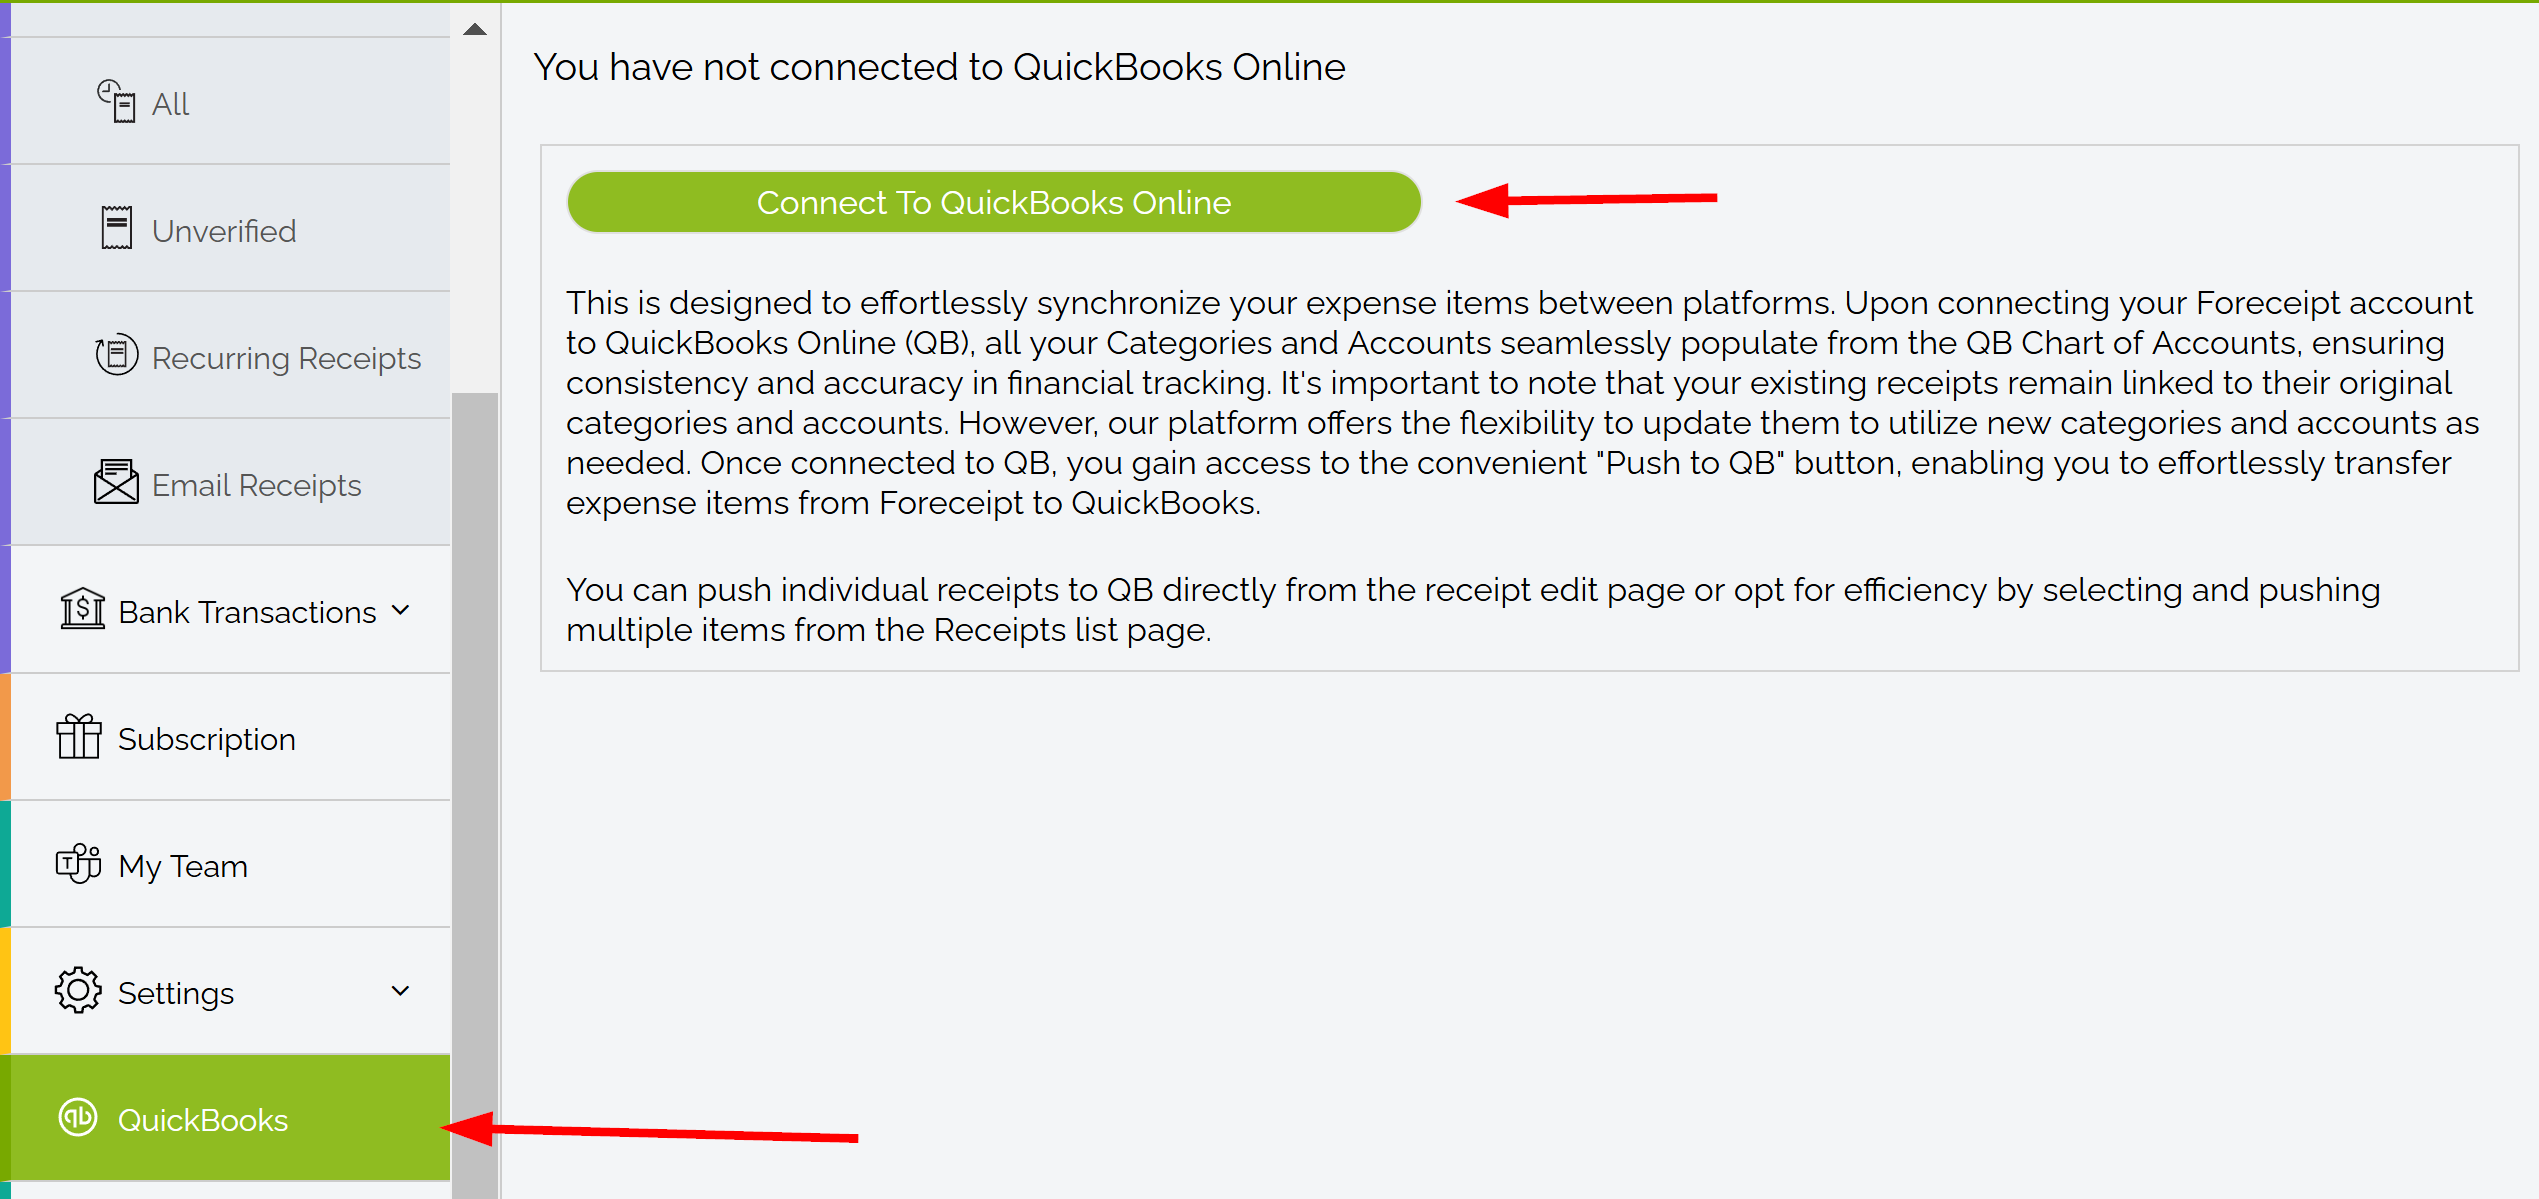
2. Connect to QuickBooks Online
- In the Foreceipt web portal, select QuickBooks Online from the sidebar.
- Click Connect to QuickBooks Online and log into your
QBO account.
Your QBO Chart of Accounts will be imported into Foreceipt for consistent categorization.
3. (Optional) Update Existing Receipts
- Click Update Account & Category of Receipt on the QuickBooks Online page in Foreceipt to align past receipts with your QBO structure. Note: receipts still tied to old Foreceipt categories/accounts can't be pushed to QBO until updated.
4. Push Receipts to QuickBooks
You can transfer receipts
in two ways:
- Open a receipt and click the Push to QB button.
- Or, select multiple receipts from the list and use Push to
QB to batch-submit.
Once pushed, receipts are locked in Foreceipt but can be unlocked if you make edits. You can push again to update them in QBO.
5. Manage Imported Categories & Accounts
- To hide imported items you don't need, go to Settings → Accounts or Categories, open the item, and select Disable. Reactivate anytime similarly.
6. Sync Updates from QuickBooks
- Changes to categories or accounts must be made in QBO.
- Return to Foreceipt and click Sync Categories & Accounts from QuickBooks Online to apply updates.
7. Disconnect When Needed
- Use Disconnect from QuickBooks Online to unlink your QBO account.
- After disconnecting, you can choose to revert to Foreceipt-native categories/accounts or keep using the synced ones.
Why This Integration Helps
- Consistency in categorization across Foreceipt and QBO
- Streamlined workflows—less manual data entry, more accuracy
- Simple updates when your accounting structure changes in QuickBooks
- Control over which accounts and categories are visible
Quick Overview
| Step | What to Do |
|---|---|
| 1 | Ensure you're on the Business plan |
| 2 | Connect to QBO from the web portal |
| 3 | (Optional) Update past receipts to use QBO categories |
| 4 | Push receipts to QuickBooks individually or in bulk |
| 5 | Hide any unnecessary imported categories/accounts |
| 6 | Sync updates from QBO when needed |
| 7 | Disconnect if you want to revert to Foreceipt defaults |
Recommended: Watch the Video Tutorial
2-minute: How a Team Collaborates in ForeceiptThis video walks you through the entire process step by step and is the easiest way to learn.
— or —
Step-by-Step Guide
Follow the written steps below if you prefer reading or need a quick reference.
What Does Team Collaboration Offer?
- Bring your team together in Foreceipt.
- Choose from flexible permissions—Admins, Editors, or Viewers—to tailor access levels.
- Easily view, edit, and report on receipts as a group.
- Generate consolidated reports that include receipts from everyone on the team.
Step-by-Step: Getting Started Together
1. Create Your Team
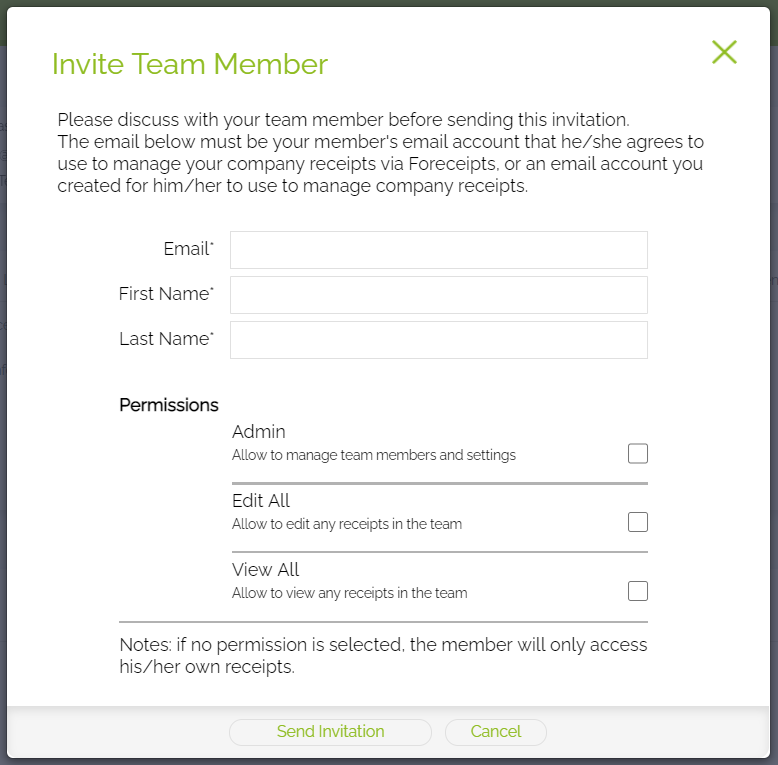
Log in via the web portal or app and go to "My Team" in the main menu to set up your team.
2. Invite Team Members
From the "My Team" page, click "Invite Team Member," enter their email, and define their permission level.
3. Members Join the Team
Invited users receive an email. They can click the link or sign in to the web portal and accept the invite. Their receipts will then auto-sync to the team.
4. Manage Your Team
Admins can:
- Invite or remove members
- Adjust permissions (e.g., Own-only, View All, Edit All, Manage Team)
- Resend or cancel invitations
All receipts from members remain accessible to the team even if someone is removed.
5. Receipt Access Levels
- Admin: Full control over team settings, categories, accounts, invites, and receipts.
- Edit All: Can view/edit all receipts but cannot adjust categories/accounts or manage team.
- View All: Can only view everyone's receipts, plus manage their own.
- Basic Member (no special permission): Can only access and manage their own receipts.
6. Generate Team Reports
Admins or users with View All or Edit All access can generate comprehensive reports. Reports can be created from the Reports tab or Receipts → All view in the web portal.
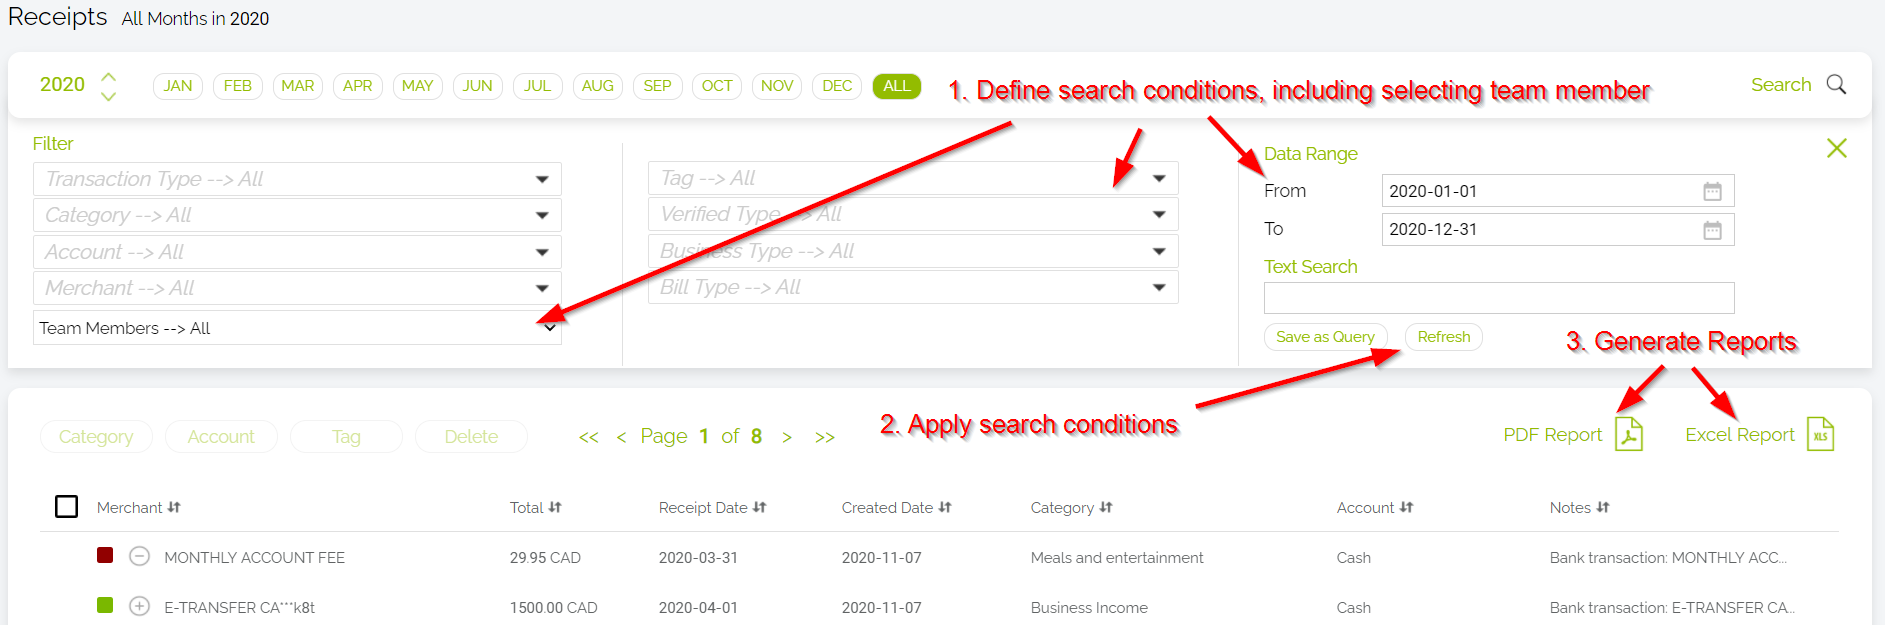
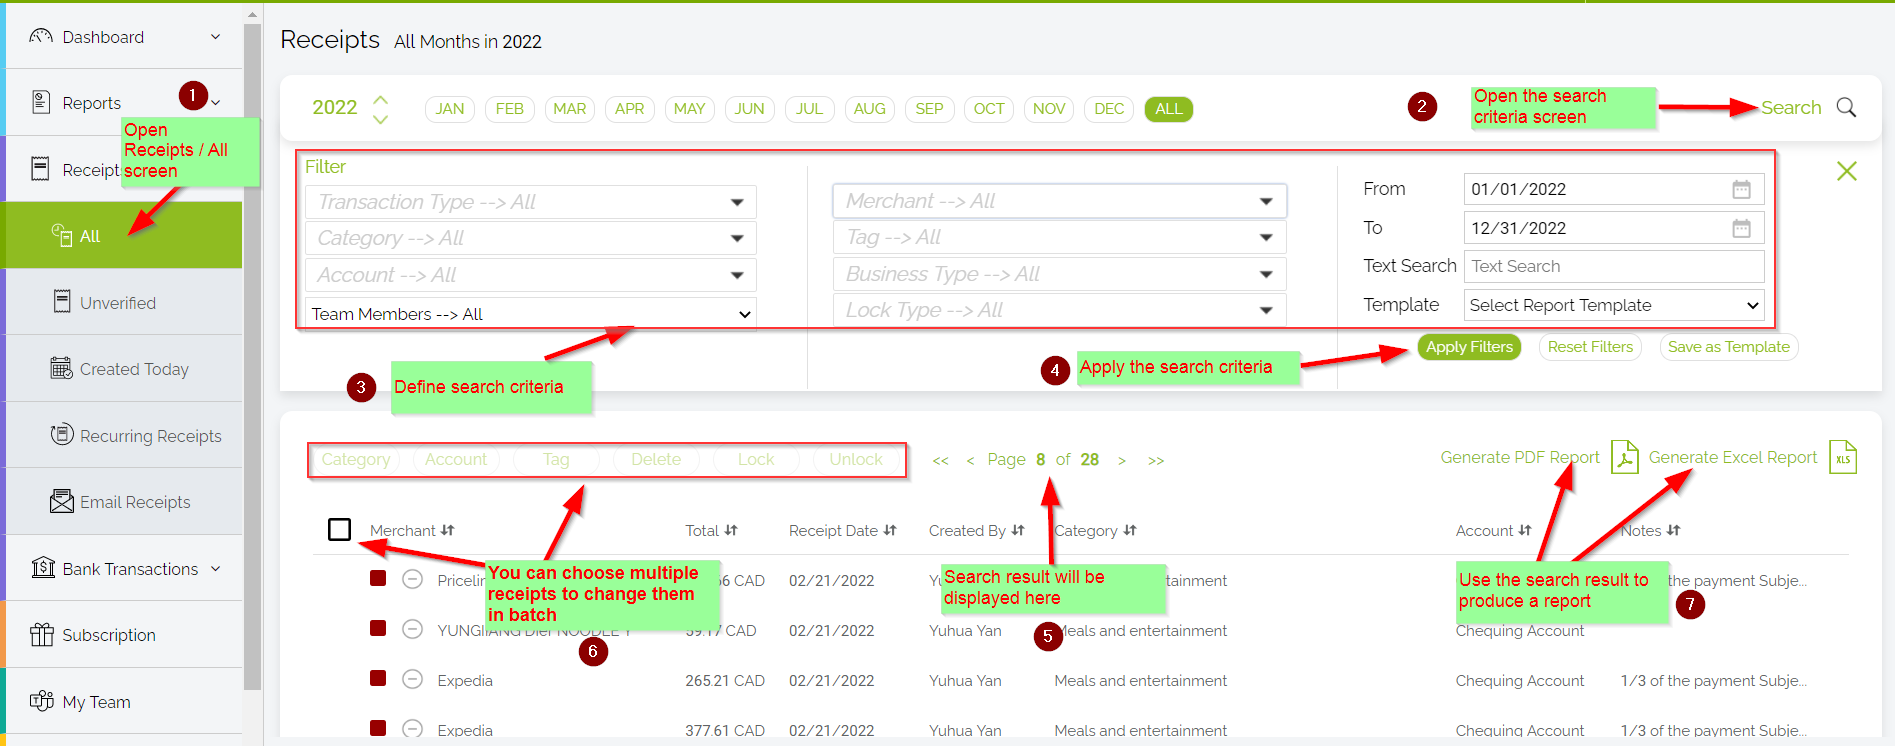
Here is an example how a team owner can generate team report by following 3 steps from the "Receipts / All" screen:
Recommended: Watch the Video Tutorial
2-minute: How Do Referrals Work on the Web PortalThis video walks you through the entire process step by step and is the easiest way to learn.
— or —
Step-by-Step Guide
Follow the written steps below if you prefer reading or need a quick reference.
What You'll Receive
Invite a friend to Foreceipt, and both of you will earn 200 bonus receipt credits once they sign up using your invitation. Bonus credits never expire!
How to Refer a Friend from the Web Portal
- Log in to Foreceipt.com.
- Navigate to the Referral menu.
- Choose one of two ways to invite:
- Send via Email
- Enter your friend's email address and click Invite.
- Once they click "Accept Invitation Now" and register, you'll both receive 200 bonus receipt credits.
- Share Your Referral Link
- Copy your personalized link and share it directly or on social media.
- When someone signs up using that link, both of you will receive the same 200 credits.
- Send via Email
Why Use It?
- Rewarding: Get free credits you can use for scanning or expense tracking—at no cost.
- Effortless: A few clicks or a simple link share, and you're done.
- Unlimited Potential: There's no limit to how many people you can invite or bonus credits you can earn.
Quick Summary Table
| Referral Method | What You Do | Result |
|---|---|---|
| Email Invitation | Send invite via Referral page | Both you and friend get 200 credits |
| Referral Link | Share your link publicly or privately | Both you and new user get 200 credits |
You can now view your up-to-date account balance in Foreceipt. This balance is calculated automatically based on your initial balance and all activity since that date.
How the Balance Is Calculated
Foreceipt calculates your current balance like this:
Current Account Balance = Initial Account Balance
+ All Money In Since Initial Balance Date
– All Money Out Since Initial Balance Date
👉 If you have not set an initial balance, Foreceipt assumes 0 as the starting balance at the end of last year.
Where to Find Your Current Account Balance
- Log in to the Foreceipt web portal.
- Go to the Dashboard Balance section.
- Your current account balance will be shown there.
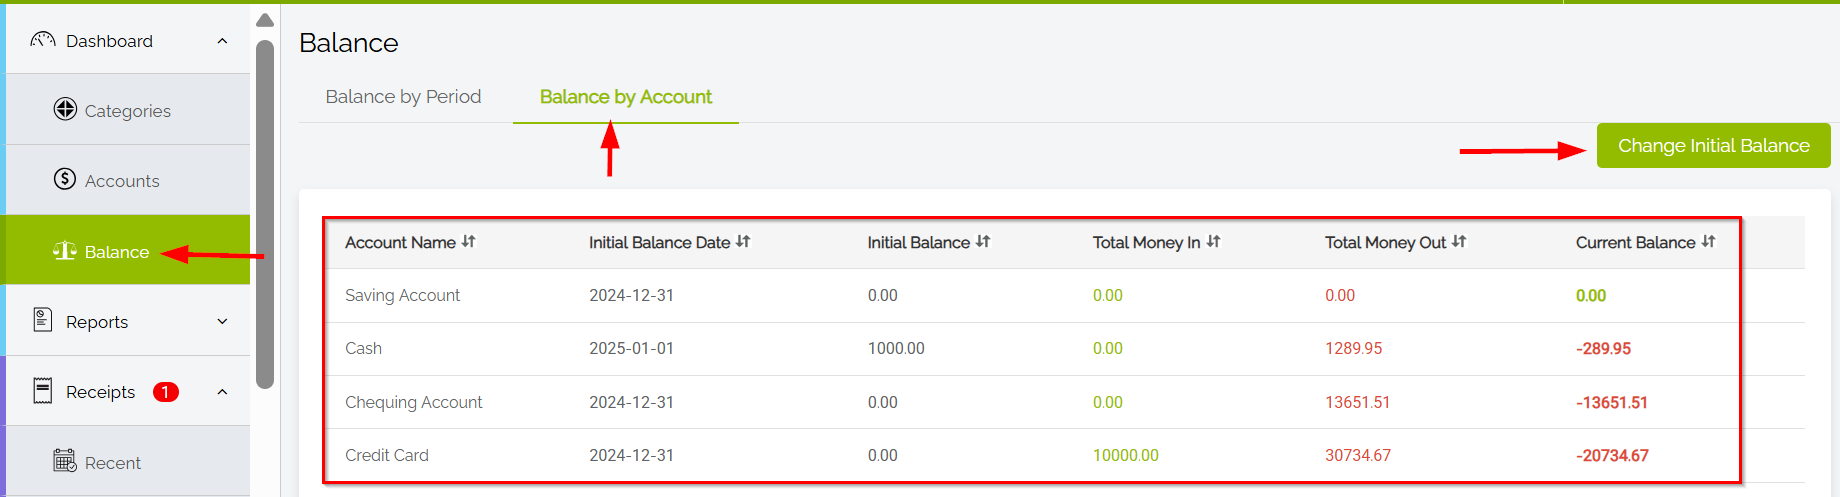
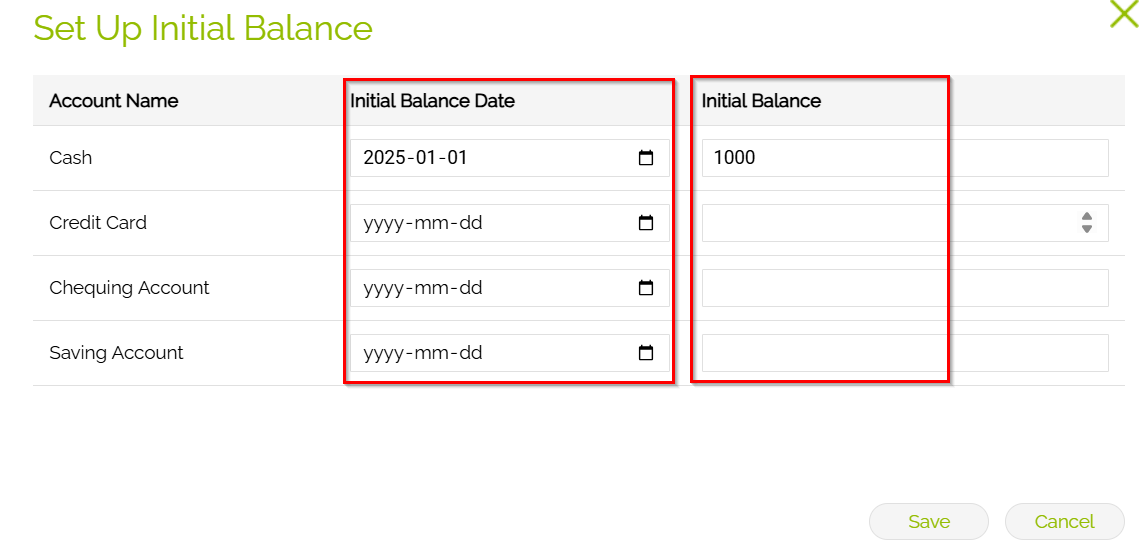
How to Set or Update Your Initial Balance
- On the above screen shot, click the Change Initial Balance button.
- Find the account you want to update.
- Enter the Initial Balance and select the Initial Balance Date.
- Save your changes.
Tips
- Use the web portal to set or edit your initial balance — this ensures Foreceipt calculates your balance correctly.
- Balances update automatically as you add or edit receipts and transactions.
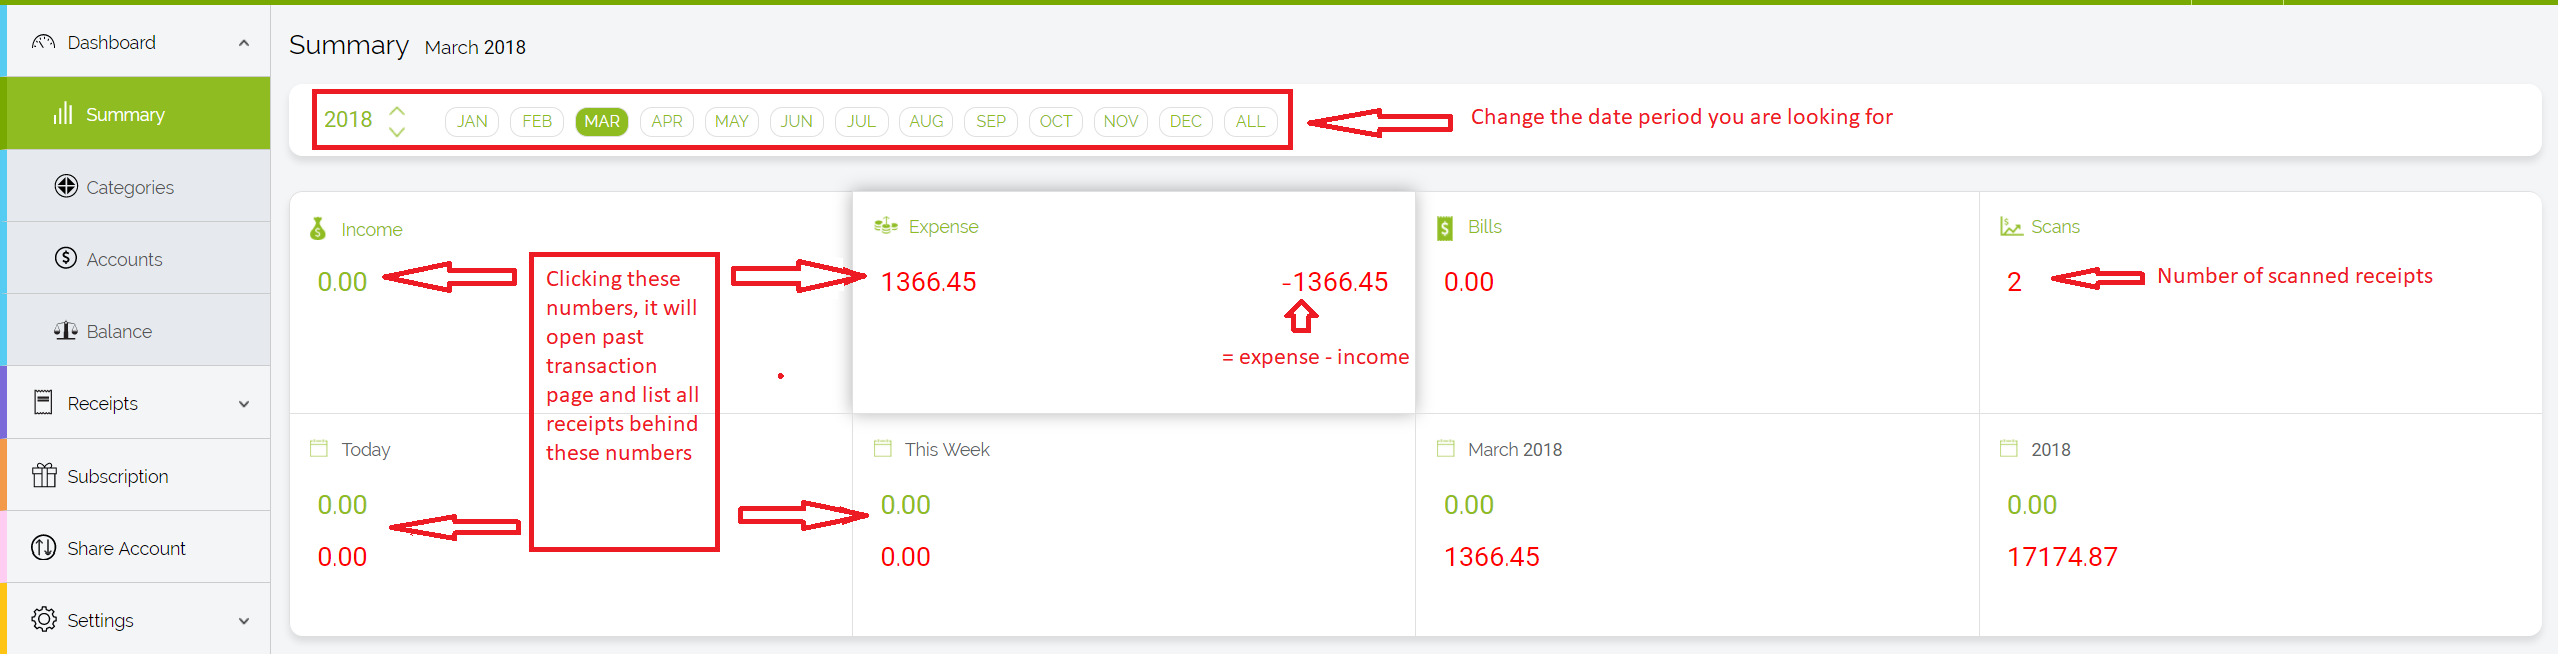
The Dashboard in Foreceipt gives you instant visibility into your financial data—totals, trends, and insights—at a glance.
It also allows you to set initial account balance and get the latest balance for the account.
What You'll Discover on the Dashboard
- Summary View: Quickly find key metrics like your total spending, top categories, and merchant breakdowns.
- Filtered Dashboards: Explore focused views—such as weekly or monthly summaries—designed for quick decision-making.
- Set up Initial Account Balance and Get the Latest Account Balance: Please refer to the "How to Get the Latest Account Balance" FAQ for details.
- Consistent Layout: All Dashboard pages follow the same structure, making it easy to switch between views seamlessly.
How to Navigate Dashboard Pages
- Access the Dashboard
From the web portal's sidebar, locate and open the Dashboard section to view its overview. - Switch Between Dashboards
You can switch between Summary, Summary by Category, Summary by Account and Balance. You can change the time frame for each of them. - Read the Dashboard Layout
Each dashboard follows a uniform layout—typically showing:- Total expense and income for the selected time frame
- Expense and income by category or by account
Why Dashboard Pages Are Useful
- Quick insights: See what's happening with your finances at a glance.
- Efficiency: Eliminate the need to manually generate reports for basic overviews.
- Consistency: Familiar layout across dashboards ensures fast, intuitive navigation.
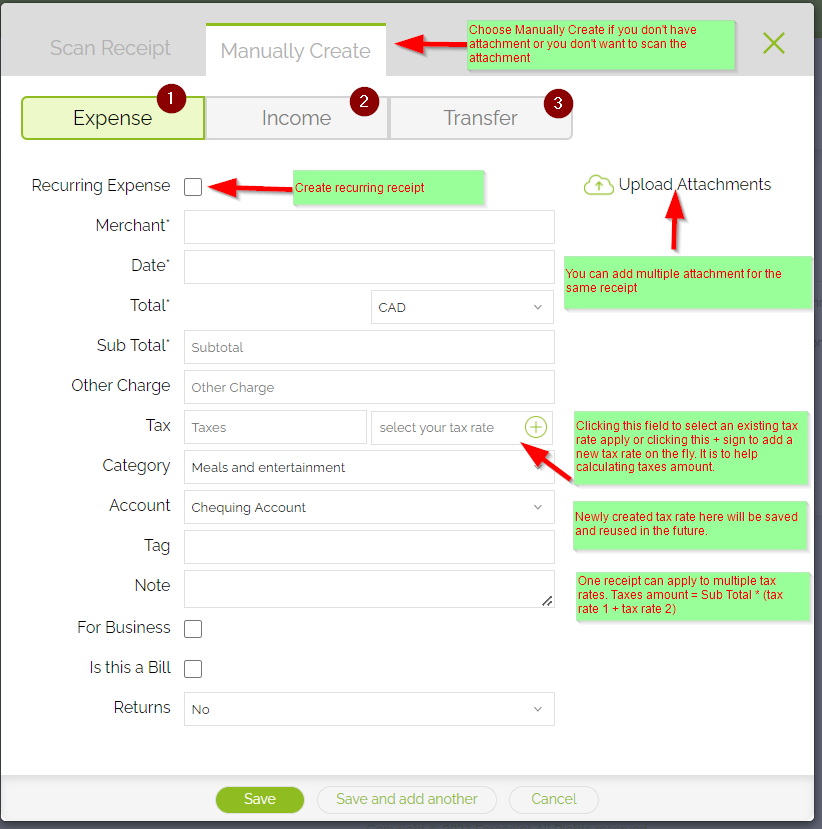
Effortlessly add new expenses or modify existing ones using the Foreceipt web portal. Here's how:
1. Creating a New Receipt
- Click the "+ New Receipt" button at the top-right corner of the page.
- This opens the receipt creation screen, where you can quickly enter details like amount, merchant, category, date, and optional notes.
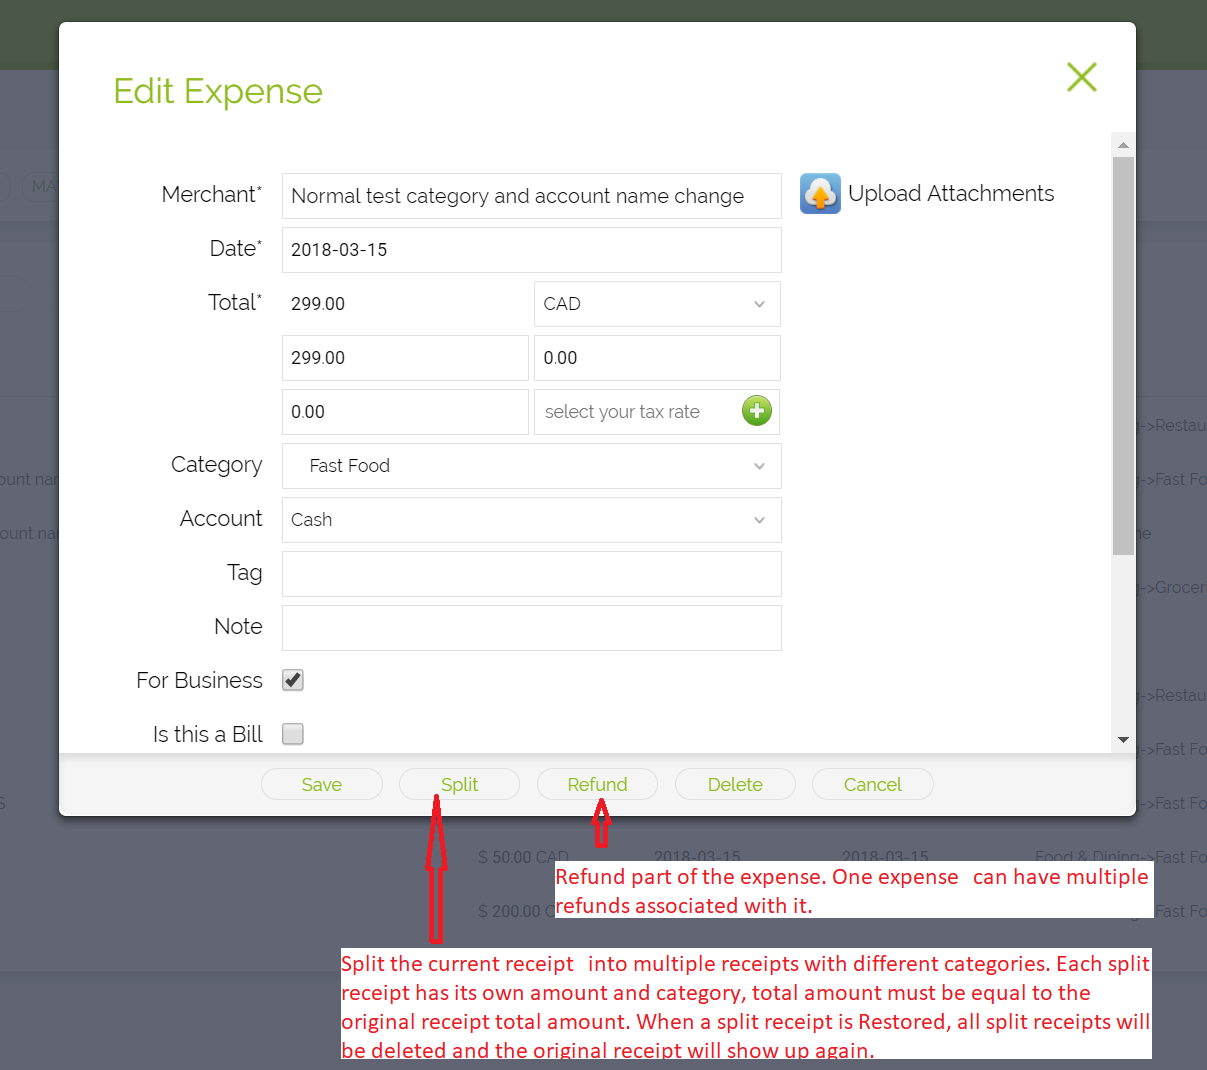
2. Editing an Existing Receipt
- Navigate to Receipts → All (or the Created Today page).
- Locate the receipt you want to update, then either:
- Double-click the receipt row, or
- Click the pen icon to open the edit form.
- Make your changes, then save to update the entry.
Need to update several receipts quickly? Foreceipt's web portal lets you bulk-edit, tag, or delete multiple entries—saving you time and effort.
How It Works
- Navigate to the Receipts List
Log in to the web portal and go to Receipts → All. - Filter or Search Receipts
Use the search icon to find receipts based on date, merchant, category, or tags. - Adjust Page Size for Efficiency
In the top-right of the list, change the default page size (usually 10) to a higher number—like 50 or 100—to see more receipts at once. - Select Receipts in Bulk
Click the checkbox in the header of the first (leftmost) column to select all receipts on the current page. - Apply Your Changes
With items selected, you can:- Apply a single category across all selected items
- Add or remove tags in one click
- Delete all chosen receipts at once
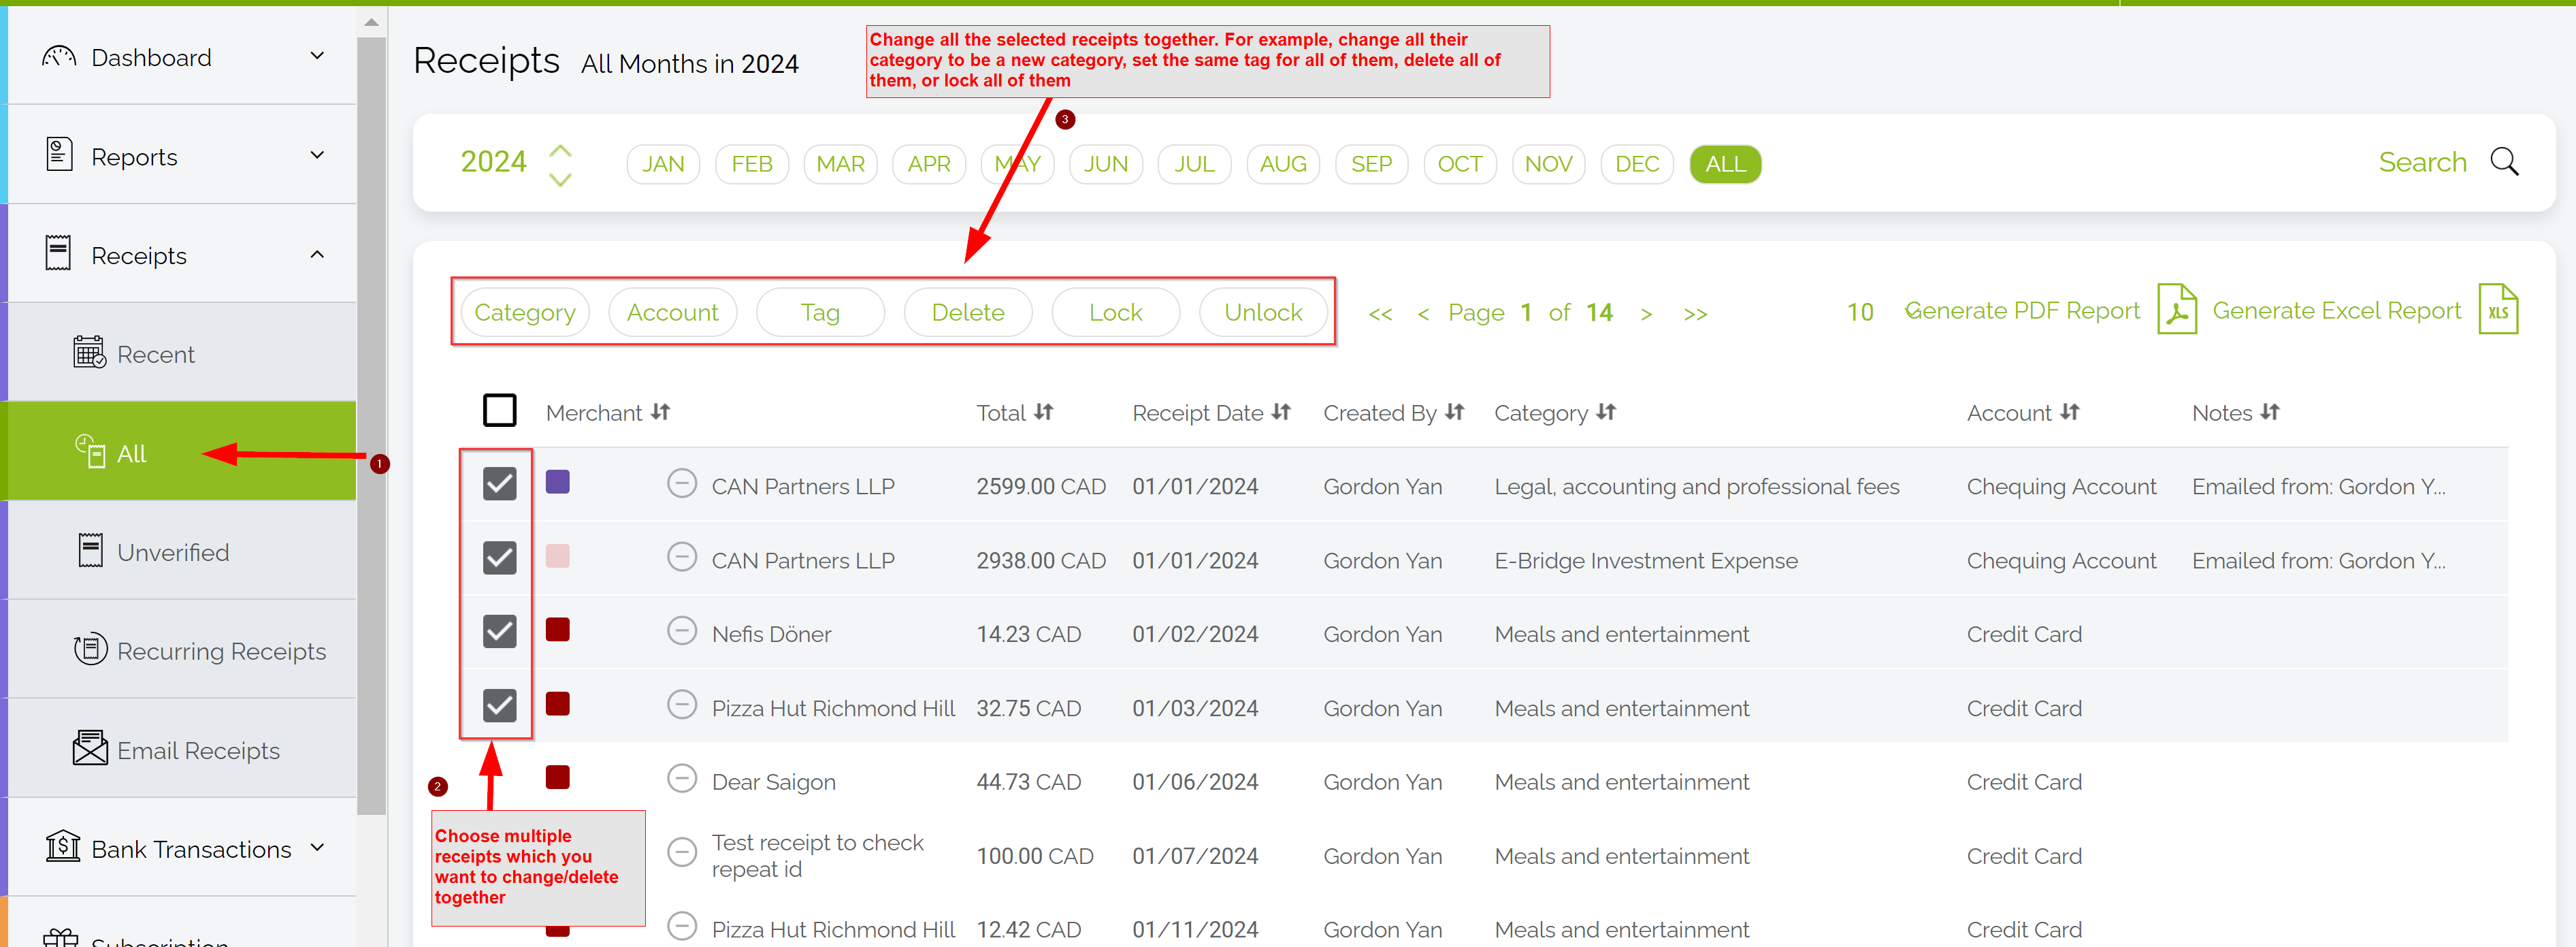
Why It's Helpful
- Speed: Update or clean up dozens of receipts with just a few clicks.
- Consistency: Ensure all similar transactions share the same category or tag.
- Control: Easily remove unwanted entries in bulk.
Recommended: Watch the Video Tutorial
1-minute: How to Quickly Search ReceiptsThis video walks you through the entire process step by step and is the easiest way to learn.
— or —
Step-by-Step Guide
Follow the written steps below if you prefer reading or need a quick reference.
How the Search Feature Works
- Access the Search Bar
In the Foreceipt web portal, find the search field prominently placed at the top (visual example shown below). - Enter Your Criteria
Type in what you're looking for—e.g., merchant name, category, amount, date, tag, or note. The search flexibly handles any field, matching partial or full text. Use operators like quotes for exact matches or keywords such ascategory:ortag:to narrow results even further. - Clear and Start Fresh Anytime
Easily clear your current search and start a new one when needed—no need to navigate away or reload pages.
Why It's So Helpful
- Ultra-efficient: Locate receipts in seconds using any attribute.
- Highly flexible: Supports searches by text, category, tag, amount, date, note — you name it.
- Light & intuitive: Works smoothly without needing filters or dashboards.
- Great for ad-hoc checks: Perfect when you're tracking something specific, like "coffee receipt under $5" or "tax tag from April."
Explore Foreceipt's available plans and subscribe with ease—choose the web or mobile app based on your convenience.
Step 1: Review Available Plans
Visit the Price Plan page to compare available options and their features.
Step 2: Choose Your Subscription Method
Option 1: Subscribe via the Web Portal (Recommended)
- Why it's best:
- Easily manage your subscription—upgrade, cancel, or change your payment method with just a few clicks.
- Business Plan is only available via the web.
- Coupon codes can only be applied when subscribing through the web portal.
- How to subscribe:
- Sign in at Foreceipt.com using the same email you use in the mobile app.
- Click on the Subscription menu located in the left sidebar.
- Choose your plan and complete the subscription.
Option 2: Subscribe via the Mobile App
- Open the side menu (tap the upper-left menu icon) and select Subscription.
- Follow the on-screen instructions to complete your subscription.
- Note: iPhone in-app subscriptions must be managed through your iTunes account, not the app.
Quick Comparison
| Feature | Web Portal | Mobile App (iOS/Android) |
|---|---|---|
| Manage Subscription | Easy (upgrade, cancel, change payment) | Limited; changes must go through app store |
| Business Plan Access | Available | Not available |
| Apply Coupon Code | Supported | Not supported |
| Ease of Use | Streamlined & flexible | Convenient, but more limited on iOS |
Tip
To get full control, access advanced features (like coupon codes or plan upgrades), or manage payments easily, it's best to subscribe via the web portal.
You can manage your Foreceipt subscription directly depending on how you subscribed—via the web or through iTunes on your iPhone.
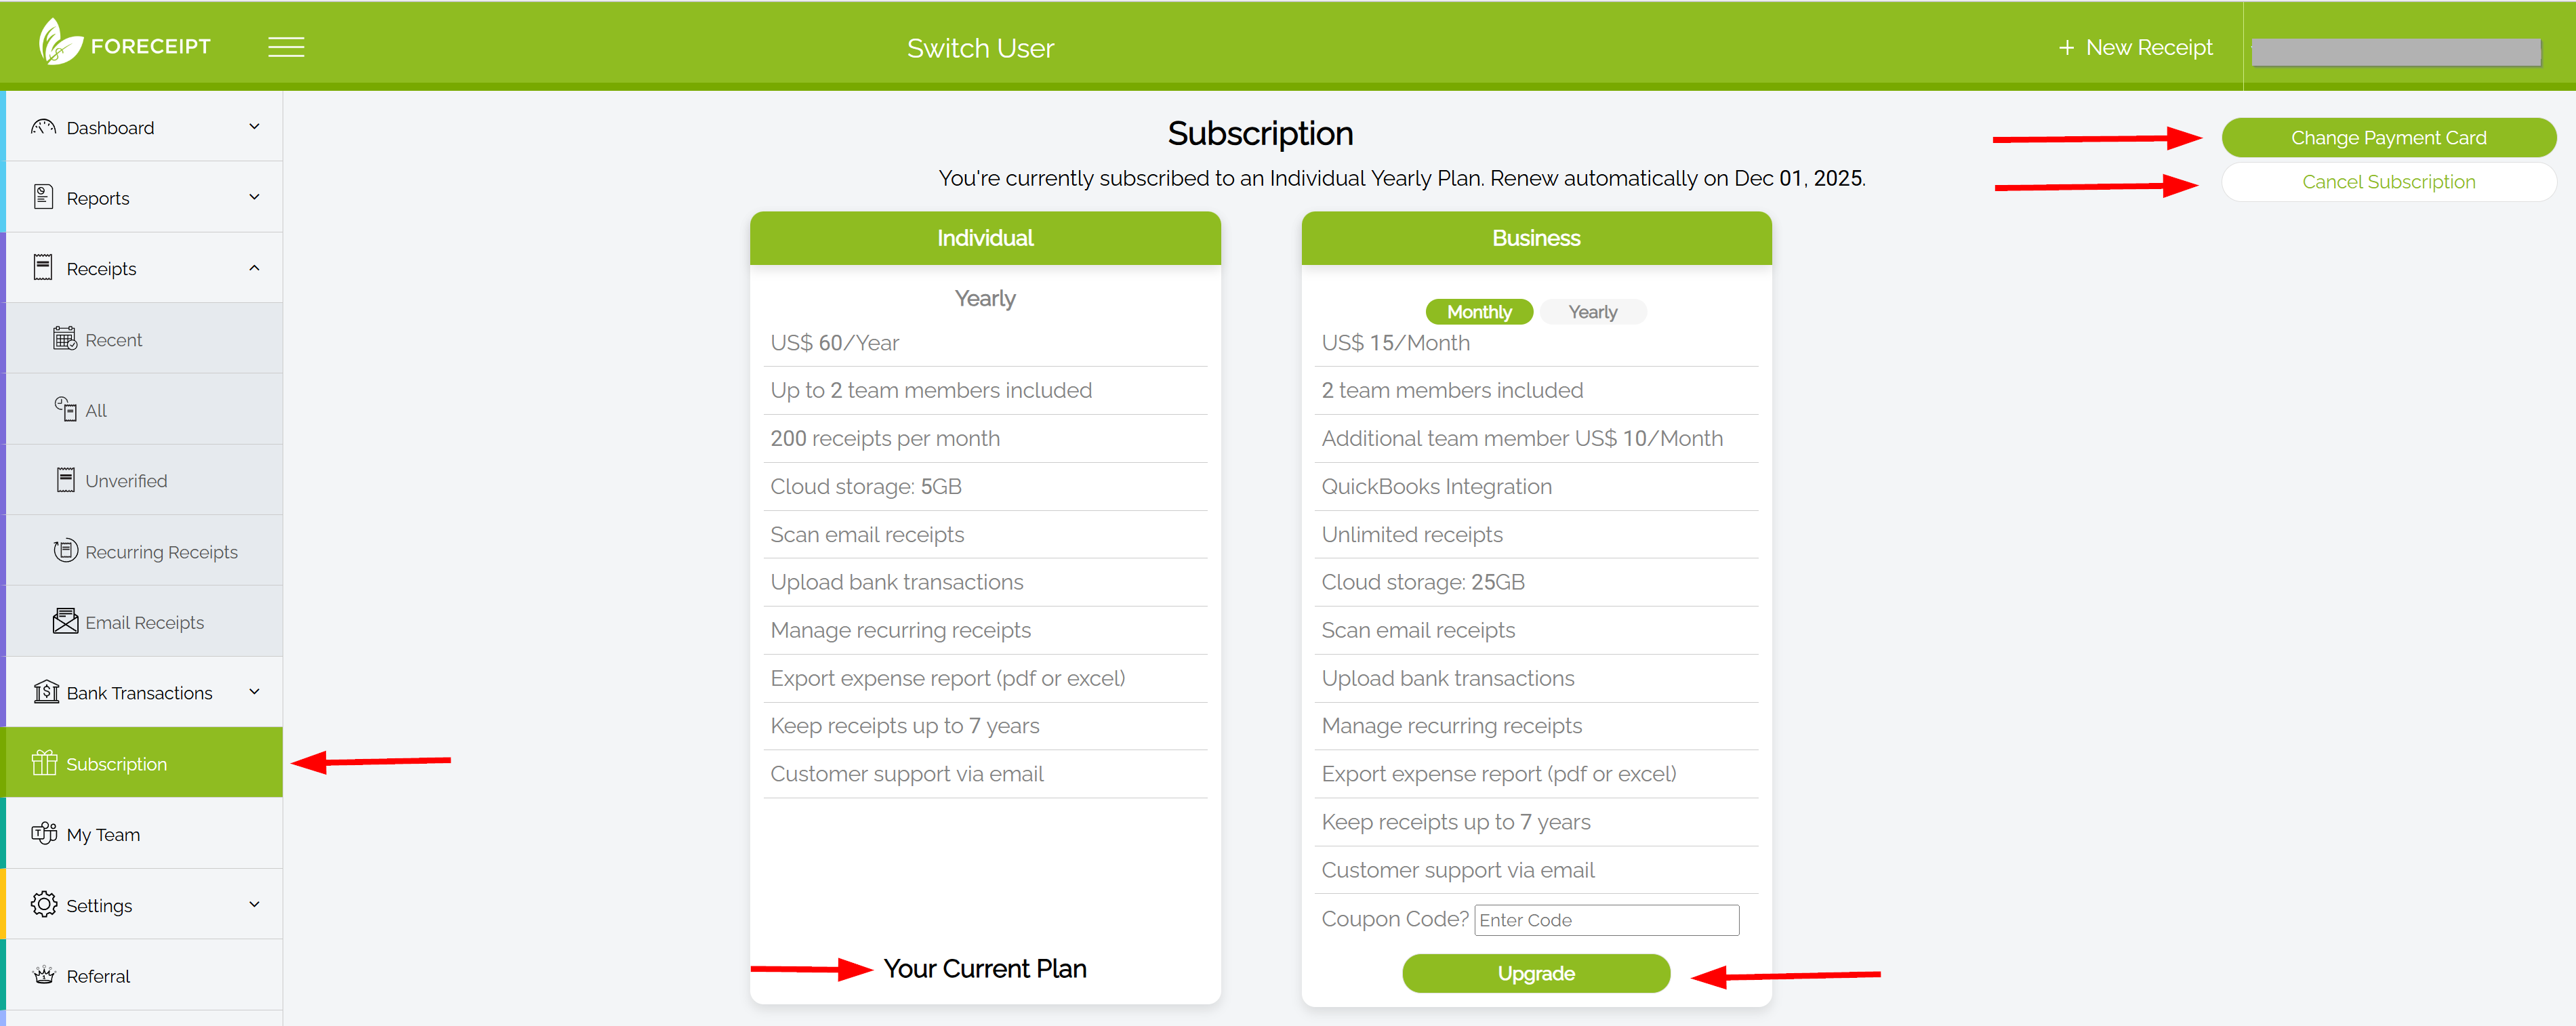
If You Subscribed via the Web Portal (Recommended)
- Log in at foreceipt.com using your account credentials.
- Navigate to the Subscription menu on the left sidebar.
- From there, you can:
- Upgrade your plan
- Change your payment method
- Cancel your subscription
This method offers the fullest control and flexibility for managing your plan.
If You Subscribed via iPhone (iTunes)
Subscriptions made through the iOS app are handled by Apple. For cancellations, plan changes, or payment updates, you must go through your iPhone's account settings or the iTunes/App Store.
Quick Comparison
| Subscription Method | Where to Manage It | What You Can Do |
|---|---|---|
| Web Portal | foreceipt.com → Subscription | Change plan, update card, cancel anytime |
| iPhone (iTunes) | iPhone settings / App Store | Change or cancel only via Apple settings |
Tip
To avoid extra steps and gain maximum flexibility—such as applying coupon codes, switching plans, or changing your card—manage your subscription via the web portal whenever possible.
Yes — securely and simply.
How Your Subscription Payment Is Handled Securely
- iOS In-App Purchases
If you subscribed through the iPhone app, payment is processed via your Apple iTunes Account. Foreceipt never accesses your card details; Apple securely handles and stores all billing information. - Web Portal or Android App
Payments here are processed using Stripe, a trusted leader in payment security. You can trust that your credit or debit information remains confidential. Foreceipt does not collect or store sensitive financial data—everything resides securely within Stripe's system.
Why It's Safe
- No credit card data stored by Foreceipt
- No additional risk beyond Apple's or Stripe's secure systems
- Protected by industry-standard security protocols
Summary Table
| Subscription Method | Payment Platform | Is Card Data Secure? |
|---|---|---|
| iOS App (In-App Purchase) | Apple iTunes | Yes — card info managed by Apple |
| Web or Android App | Stripe | Yes — card info stored securely within Stripe |
Tip
For full payment control—like plan upgrades, coupon codes, or updating payment details—use the web portal. But rest assured, whichever way you subscribe, your payment data remains in safe hands.
Billing Schedule
- Your payment is charged immediately when you confirm a purchase or automatically at the end of each subscription period.
- No refunds are issued once a payment has been processed.
Subscription Renewal
- Subscriptions automatically renew unless auto-renew is disabled at least 24 hours before the end of the current billing cycle.
- To avoid unwanted charges, cancel or disable auto-renew before that 24-hour window closes.
Quick Summary Table
| Scenario | What Happens |
|---|---|
| New subscription | Charged immediately at signup |
| Receipt of renewal payment | Charged at end of previous period |
| Canceling auto-renew | Must do so at least 24 hours before renewal |
| Refund request after charge | Not available |
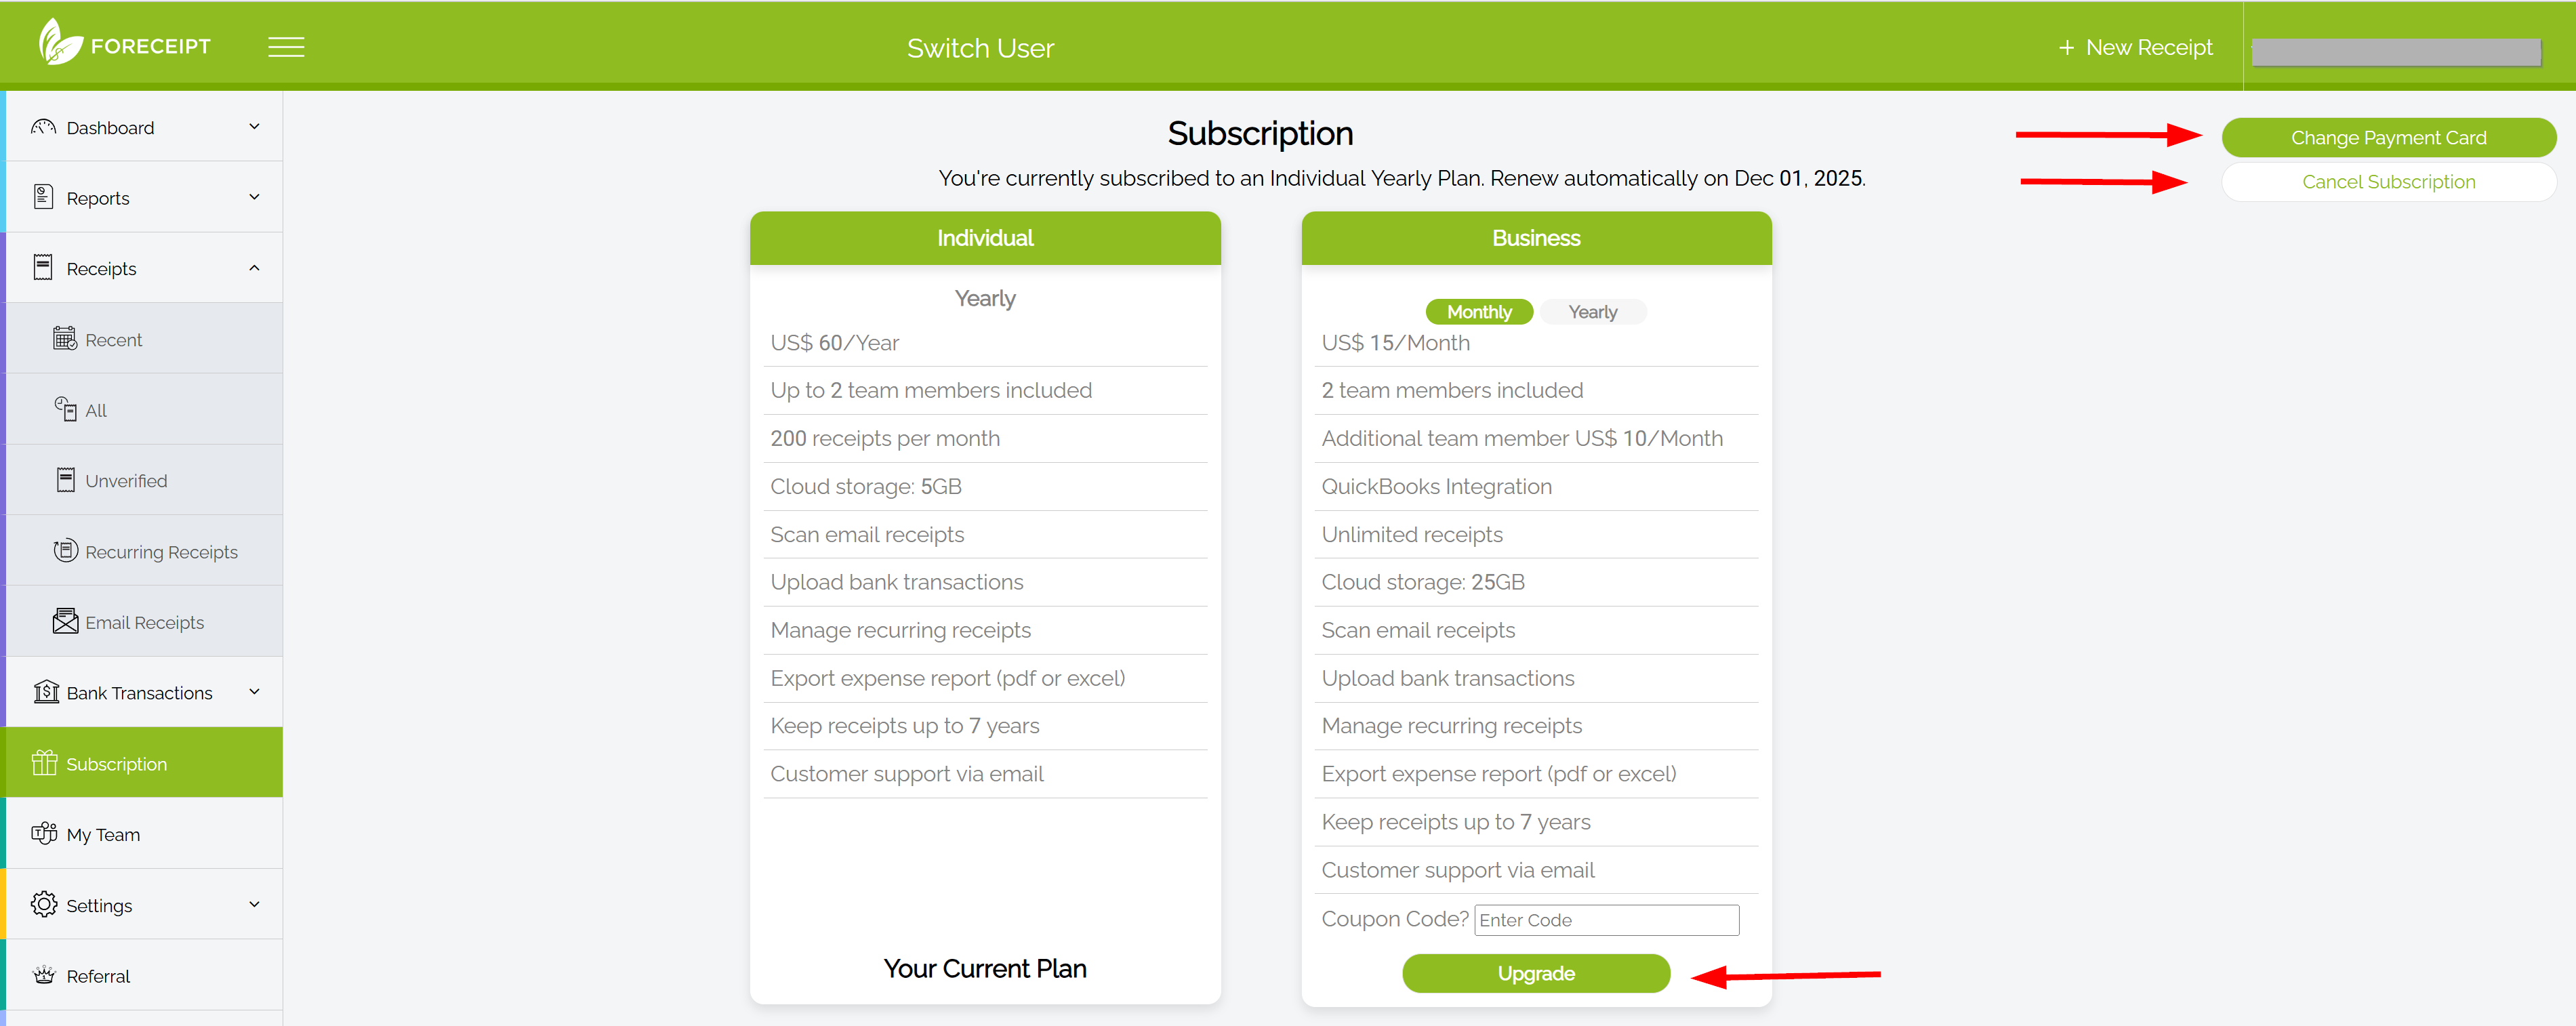
Want to apply a discount to your subscription? Follow these steps using the Foreceipt web portal—coupon codes aren't accepted in the mobile app.
Step-by-Step Guide
- Log In via Web
Sign into foreceipt.com using the same email you use in the mobile app. - Go to Subscription
In the left sidebar, click on the Subscription menu to access your plan options. - Apply Your Coupon Code
On the Subscription page, you'll find a field labeled "Coupon Code." Enter your code here, then apply it to see the discount reflected before completing your purchase.
Quick Summary
| Task | What to Do |
|---|---|
| Where to apply the code | Only in the web portal—visit Subscription section |
| Before or after subscribing? | Must apply it before finalizing your plan |
| Mobile app usable? | No—coupon codes are not accepted in the mobile app |
Still have questions?
Can't find the answer you're looking for? Our support team is here to help.
Contact Us